How to Automate Purchase Orders (Auto-POs)
1.8 min read
|In the Purchasing module, Extensiv Order Manager simplifies your reordering process by generating automated purchase orders, or auto-POs, when your stock goes below your minimum inventory levels. The Purchasing module also allows you to:
- Manually create POs
- Add, print, send (and re-send), receive, void, and cancel POs
- Authorize and following a PO update, re-authorize POs
- View the PO status
- View details of your POs, including line items
- Update details and costs
- Manage PO milestones
The Purchasing module is split into three main sections: the left panel, the high-level view, and the detailed view. The left panel shows the varies PO statuses. If you click the magnifying glass, the left panel will become the Search panel, which allows you to search for purchase orders and export them if needed.
The rest of the module is split into a high-level view of purchase orders on the top of the screen and a detailed view of purchase order line items on the bottom of the screen. Select the checkbox next to a purchase order in the high-level view to see a detailed view of the line items in the bottom of screen.
If you select the checkbox for a PO in the high-level view, the buttons along the top of the screen will allow you to perform various actions, like authorizing the PO if it's in Awaiting Authorization to send it to your vendor. If you need to update the line items of a PO, select the checkbox next to the PO to see the line items in the detailed view and use the buttons on the right side of the screen. If you need to add an item, click the Add Item button, and if you need to edit or remove an item, click into the line item row to select it before clicking the Edit or Remove button.
How to Automate Purchase Orders
Now that you have an understanding of the layout of the Purchasing module and where to find auto-POs, you can begin using auto-POs. If auto-POs weren't enabled when you first set up your Extensiv Order Manager account, you can enable them now by following the steps below.
- Log in to Extensiv Order Manager.
- Click on the Settings module.
- Click on Company Info.
- Scroll to the Purchase Order Settings section and select the checkbox next to Auto PO Generation? You will also need to add a PO number prefix if one does not exist already. The PO number prefix will be added to the beginning of each PO number and can be a number or text value.
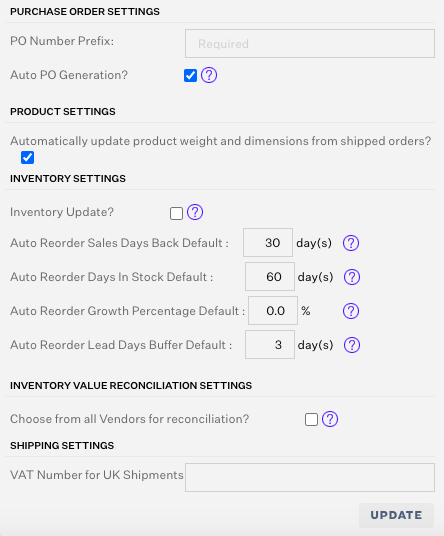
- Scroll down and click on the Update button on the bottom of the screen to save changes to the Purchase Order Settings and enable Auto-POs.
Auto-POs will begin to appear in the Purchasing module based on the minimum inventory levels and auto-reorder rules for your SKUs. To locate auto-POs, search for purchase orders that have been created by Extensiv Order Manager (the Created By column will list Extensiv Order Manager as the user that created the PO).
For more details on how Auto POs are calculated, keep reading here.