Uploading Inventory via Spreadsheet
2.5 min read
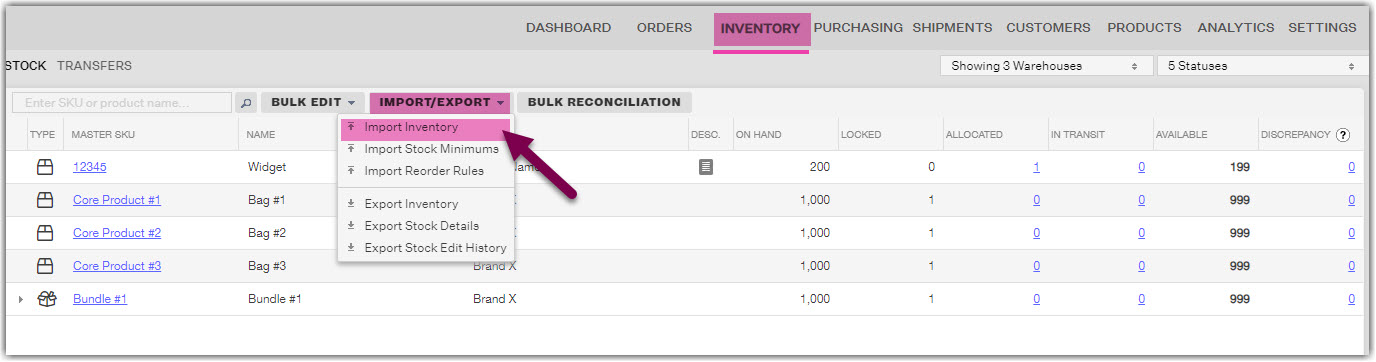
|To upload (or update) inventory in bulk via a spreadsheet, click into the Inventory module and then click “Import/Export” in the top-middle of the page. Then click “Import Inventory”.
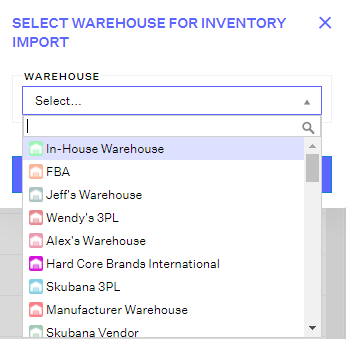
A new window titled “Select Warehouse For Inventory Import” will appear. Here, you must select a warehouse to import inventory INTO. This drop-down list will include all of your active warehouses.
Please note
for all warehouses selected that aren’t an "In-House" type, the window may be titled, “External Warehouse Manual Inventory Import”. This is because there are different inventory import Excel templates for the various Extensiv Order Manager warehouse types (In-House Warehouse, 3PL, Dropship Vendor Warehouse, etc.)
Once you’ve selected a warehouse and click “Continue”, you’ll be directed to a new window, titled “[Name of Warehouse] Inventory Import”.
On this new window, there are a few things to pay attention to:
As a next step, click “Download the Excel Template for Inventory Import” and then open the spreadsheet file. The first sheet of this spreadsheet includes instructions for how to complete the document, which must be filled in on its second sheet, titled “Inventory”.
The required fields for the In-House Warehouse Inventory import include:
- Master SKU (column A): the Master SKU of the product you are updating inventory for. This could be a core product or bundle/kit
- Brand (column B): the brand of the master SKU. This column is not mandatory and can be left blank
- Location (column C): the stock location for the new inventory you’re adding. You can create new locations here as well by entering in a currently non-existing location for the master SKU
- Draw Rank (column D): tells Extensiv Order Manager which priority it should give this particular location, assuming there’s more than one location per Master SKU
- Active (column E): this tells Extensiv Order Manager if the location should be activated or deactivated (must either be"TRUE" or "FALSE")
- Is Pickable? (column F): tells Extensiv Order Manager if the location can be used as a pick location for this Master SKU’s new inventory. If the location is not pickable (column set to FALSE), then Extensiv Order Manager will not communicate inventory from this location to your sales channel. Inventory will also not be allocatable from non-pickable locations
- Is Receivable (column G): tells Extensiv Order Manager if the location can be used as a receivable location for this Master SKU’s new inventory. If the location is not receivable (column set to FALSE), then Extensiv Order Manager will not display this location when receiving a PO line for the specific Master SKU
- On Hand Stock (column H): tells Extensiv Order Manager how much on hand stock is at the location for this Master SKU
- Locked Inventory (column I): tells Extensiv Order Manager how much inventory should be listed as “Locked” at the location for this Master SKU
- Location Min. Level (column J): tells Extensiv Order Manager what the minimum inventory level should be for this location, for this Master SKU. This is an arbitrary number set by the seller.
Prior to uploading, it’s a best practice to rename the file with the current date and time of the upload for your records. Once complete, click “Select” and upload the new inventory file. Then click “Continue”.
At this point, Extensiv Order Manager will begin uploading the file. This process may take a few seconds to several minutes, depending on the number of updates included in the file.
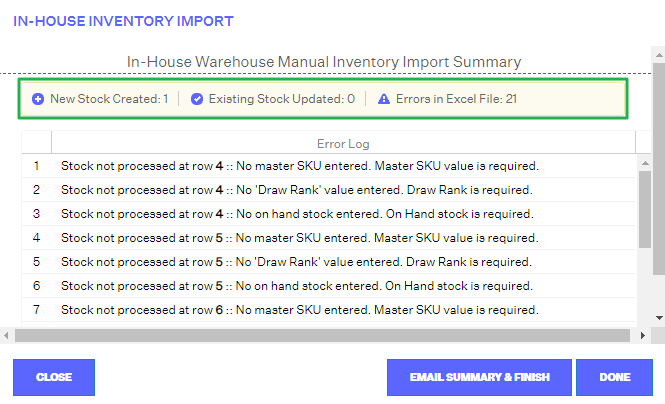
After the upload is complete, another window will appear, titled “[Name of Warehouse] Inventory Import”. This will include a summary of what was and was not accomplished, including:
- New Stock Created: inventory for new Master SKUs added into Extensiv Order Manager
- Existing Stock Updated: inventory for existing Master SKUs that has been updated in Extensiv Order Manager
- Errors in Excel File: the number of import errors discovered by Extensiv Order Manager
The “Error Log” will detail which errors occurred during the inventory import. Once you read the summary and/or error log, you may click:
- Close: this will close the window and return you to the Inventory module
- Email Summary & Finish: this will email your user email address a summary of the import, then close the window and return you to the Inventory module
- Done: this will close the window and return you to the Inventory module
At this stage, inventory has been uploaded/updated via spreadsheet!