FBA Workflow
4.0 min read
|As of March 1st, Order Manager shows an error when making changes to "Send to Amazon" workflow orders as a result of Amazon migrating API sellers to “Send to Amazon”. Kindly make sure not to view, or make changes to "Send to Amazon" workflow in Seller Central as it invalidates the API updates, and handle every change through the Order Manager.
This is not something within Extensiv's control, but rather is a decision made by Amazon.
Within Extensiv Order Manager, sellers have the ability to create Fulfillment by Amazon (FBA) Shipments without the hassle of doing it directly in Seller Central.
FBA Workflows are shipments created in Extensiv Order Manager for inventory to be sent from your warehouse source to Amazon's Distribution Centers in order to make that inventory available to sell under the FBA program.
To create your FBA workflow plan, click into the Orders Module. From there, you should click New Order. Once clicked, select FBA Workflow from the dropdown menu.
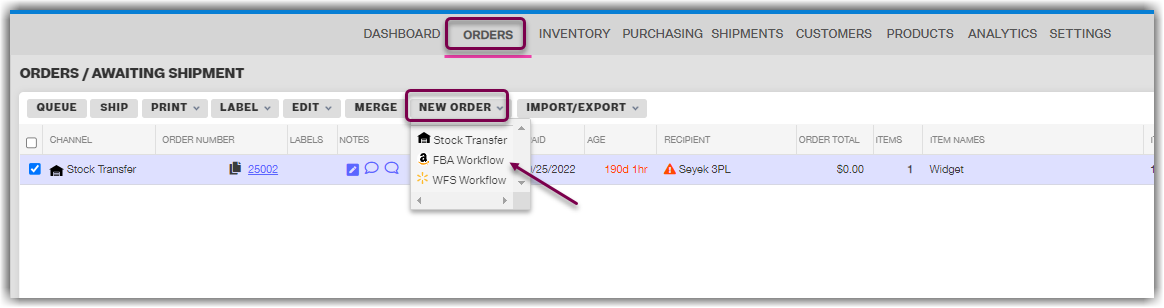
A new prompt will open and ask you to indicate a “Pending Shipment Plan Name”. This name will eventually be overwritten when you are ready to submit the plan over to Amazon. This interim name cannot contain special characters, including spaces.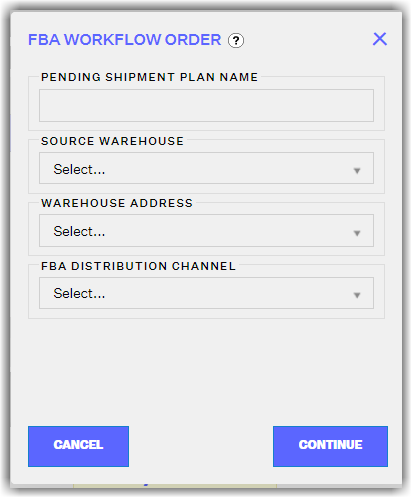
The three dropdown menus will ask you to select the source warehouse, which is the warehouse that the inventory will be pulled from, a warehouse address, for which you have the warehouse's Basic Info address and any Secondary Addresses as options, and the third dropdown is the destination FBA channel (ie: Amazon US vs Amazon FR or CN).
At the top of the next window that appears, notice that both the source warehouse and the destination sales channel, which you previously selected on the first page, are displayed. You can also choose your preference, between you as the seller or Amazon.
Lastly, you also have the option to select Based on In-stock Days. Checking this option will tell Extensiv Order Manager to only calculate sales velocity based on the days you actually had inventory at FBA.

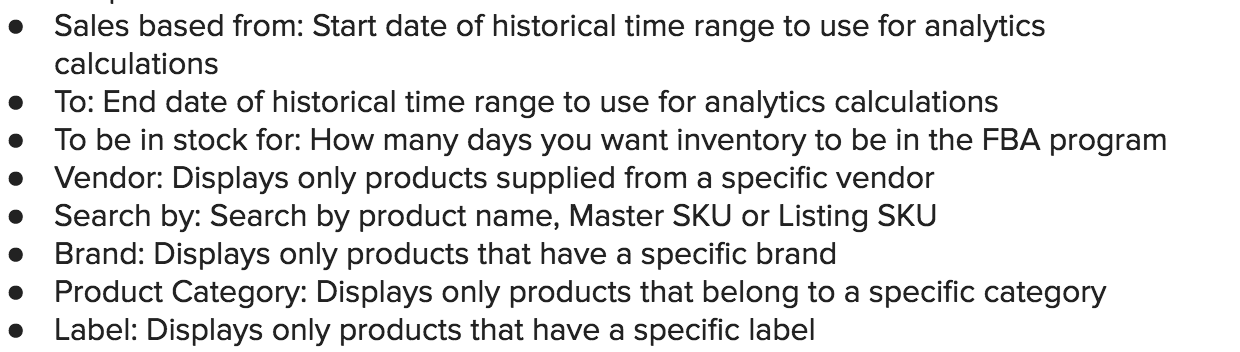
Below is a group of search and filter fields that will help customize the data you wish to see represented in the report below. Make sure to click the Apply Filters button after making any changes to the default values.

The filter options are:
From there, the next section displays columns with information on each product. All columns are sortable except for the “Available” column. The data points are:

Once you have checked off the SKU(s) you wish to send, click the Add button to add them to the bottom grid.

The bottom grid displays any items in the plan, along with the quantity being sent. This information is automatically pulled from the top report from the column “Qty. to Transfer” in addition to the “quantity per case”. Regarding the quantity per case, this is the total number of units that make up each case, not how many cases you are sending. Feel free to override the quantities suggested by Extensiv Order Manager.

If you wish to take an item out of the plan that you are working on, select the item(s) and click the “Remove” button.
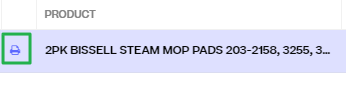
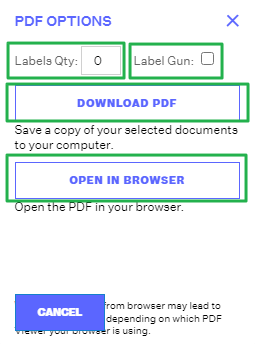
Next to each product name is a small printer icon. This clickable icon will give you the ability to generate your product labels if you chose to do so from this window. There are many other places within Extensiv Order Manager where you can print your item labels as well.
If you click the printer icon, a new pop up will appear. This window will ask you to select the following:

You also have the ability to paste all of your FBA workflow data as CSV if you choose not to go through the list directly. You will need these required fields to complete a CSV paste:

From the “New FBA Workflow Order” window, you have two options to proceed with:

If you select “Next – Generate Preview” the following page will be similar to the window in Seller Central, where Amazon divides up your plan into separate shipments and chooses the address(es) to ship it/them off to. The fulfillment centers and addresses presented are set by Amazon's API and cannot be edited.
Within this window, you also have the option to override the more traditional “Shipment Name”, which has already replaced your original pending shipment plan name, with your own custom name.
NOTE
You cannot use the same shipment plan name more than once.
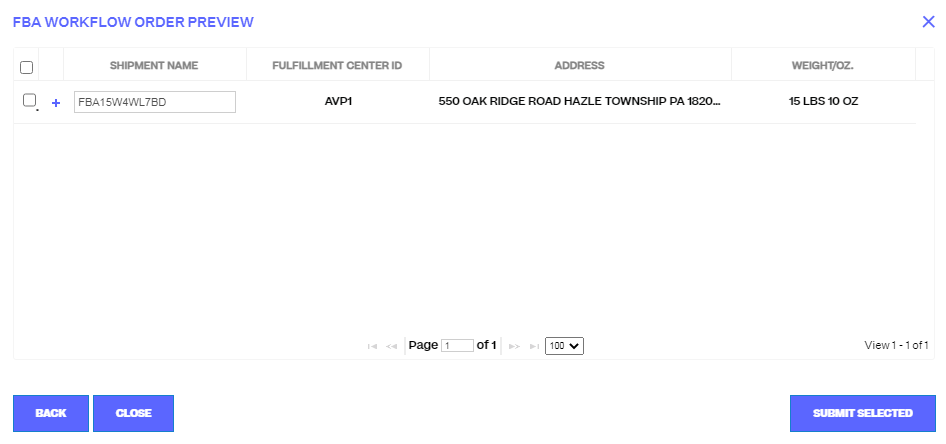
Within this window, if you click on the + sign next to each shipment, you will have more prep preferences to review and select.
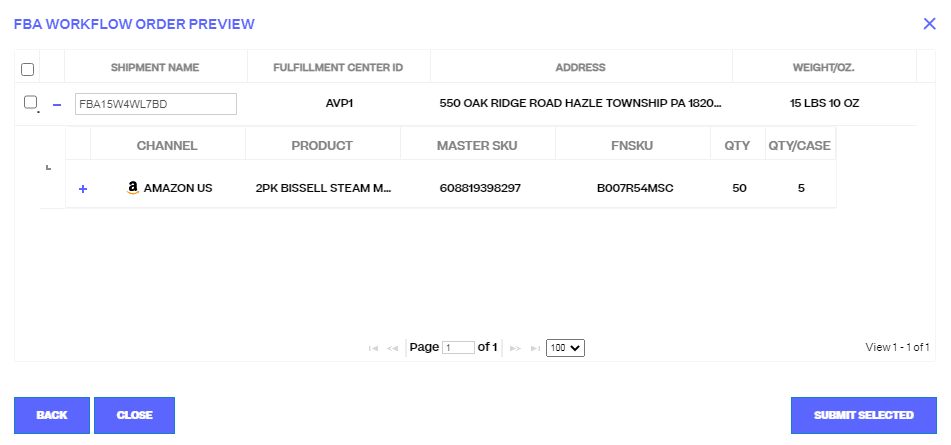
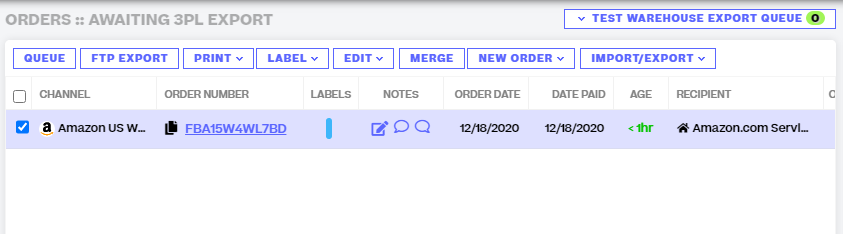
Once satisfied with all aspects of your order, select “Submit Selected”. Once submitted, the order will be registered in Seller Central and the physical order in Extensiv Order Manager will move to the appropriate fulfillment source category (i.e. “Awaiting Shipment”, “Awaiting 3PL Export”, “Awaiting Dropship”).
For next steps, refer to the section for the status your order ends up in:
Awaiting Shipment: You can generate small parcel and LTL/FTL shipping labels in Extensiv Order Manager with Amazon Partnered Shipping. Once the labels are generated and the order is in a shipped status in Extensiv Order Manager, we will communicate the shipment data to Seller Central. If you are shipping an FBA Workflow with an alternate provider in your Extensiv Order Manager account, the box contents labels will need to be generated outside of Extensiv Order Manager. If you choose to ship the entire shipment externally, then the workflow will need to be manually marked as shipped with carrier and tracking information.
Awaiting 3PL Export: You can have the FBA Workflow shipped by your 3PL. Once shipped and the tracking information is communicated back to Extensiv Order Manager, we will update Seller Central.
Awaiting Dropship: You can have the FBA Workflow shipped by a dropship vendor. Once shipped and the tracking information is communicated back to Extensiv Order Manager, we will update Seller Central.
Alternatively, if you select Save & Close from the draft plan window, the shipment window will be closed out and the shipment will fall under the “Pending Shipment Plan” section in the Orders module. You can then re-visit your shipment and continue working on it from there.
NOTE
When an FBA Workflow is in Pending Shipment Plan status, it is not yet considered an "order" and will not show up in an orders search for the pending shipment plan number.
Under the “Pending Shipment Plan” section, you can select your order(s) via checkbox and a list of buttons will appear for you to take action on.

These buttons are:
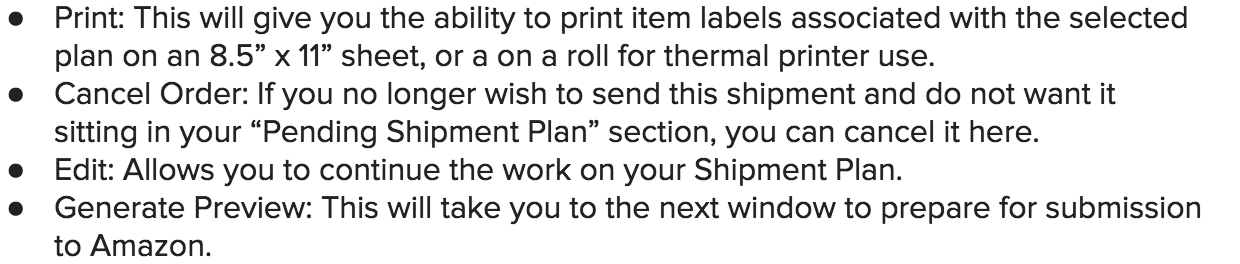
Once the shipment is generated, you can then ship it or mark it as shipped in Extensiv Order Manager. You can track the movement of your shipment by going into the Inventory Module and selecting the “Transfers” tab near the top of the page.
Once Amazon receives the shipment, Extensiv Order Manager will automatically update the FBA warehouse quantities as soon as Amazon makes those quantities available via the API.