-
Order Management
- Dashboard
-
Orders
- FBA Workflow Box Contents & Secondary "Ship From" Address
- Shipping Orders
- Resolving an Order in Missing Product Information Status
- Fulfilling an order using MCF (Multi-Channel Fulfillment) for a Core Product in a Bundle
- Changing an Order to Amazon Multi-Channel Fulfillment (MCF)
- Downloading and Printing Pick Lists
- Ship Multiple-Package Orders
- Downloading and Printing Packing Slips
- Resolving Missing Product Info Orders
- Resolving Out of Stock Orders
- Missing Stock Location and Configuring Inventory
- Creating a Manual Order
- Resolving an order that is "Missing Fulfillment Source"
- Changing Fulfillment Method and Source
- FBA Order Management
- Export an Order to a 3PL
- Searching and Filtering Orders
- Validating Shipping Addresses
- Reprinting Shipping Labels
- Multi-Channel Fulfillment
- Resolving an Awaiting Payment Order
- Can I create an RMA for an FBA order?
- Restoring a Cancelled Order
- Exporting Orders
- Merging Orders in Order Manager
- Splitting Orders in Order Manager
- Importing Tracking Information for Shipped Orders via a Spreadsheet
- Unresolved: Missing Order Info
- Unresolved: Missing Fulfillment Source
- How to add an item to an existing order
- Updating Orders in Bulk
- Customizing the organization of Columns in the Orders Module
- What does the error "Weight cannot be less than the total customs item weight" mean?
- Shipping an Order with Multiple Packages
- Extensiv Order Manager Workflow for Sending Dropship Orders via Email
- Manually Mark an Order as Shipped - Individually or in Bulk
- Customs
- Importing Orders Via Spreadsheet (In Bulk)
- Restore an On-Hold Order
- Canceling an Order
- Creating and Receiving an RMA
- Importing External Shipments
- Creating a Manual Order - Individually or In Bulk
- FBA Workflow
- Stock Transfers
- Box Contents Defaults for FBA Workflows
- Duplicate or Clone an Order
- Custom Fields for Orders (Custom Columns)
- Bulk Actions for Orders
- UPS Electronic Customs Documents - ETD & Commercial Invoices
- Shipping Orders - Processing Options
- DHL eCommerce Integration Specifics
- Amazon FBA: Common Errors and Troubleshooting
- Orderbot: Split Order by Available Stock
- Update about Accessing Orders
- Pre-order/Back Order Workflow
-
Inventory
- Uploading Inventory Through the UI
- How to Search for SKUs in the Inventory Module
- Manually Transferring Stock to Another Location
- Adding Inventory to a Stock Location Manually
- Creating Auto-Reorder Rules
- How to Filter Inventory by Warehouse
- Excluding a Warehouse from Showing Stock for all Products in Bulk
- Excluding Warehouse's Stock at the SKU Level
- Importing Stock Minimums
- Uploading Auto-Reorder Rules in Bulk
- Inventory Module Overview
- Incoming Units per Master SKU
- Inventory Update Triggers
- Inventory Value Reconciliation
- Channel Allocation Rules in Bulk (Global)
- Importing Inventory
- Channel Allocation Rules
- Uploading Inventory via Spreadsheet
- Inventory Rules per Master SKU
- Inventory Rules - Edit History
- Importing Reorder Rules
- Exporting Inventory
- Exporting Stock Details
- Inventory - How Extensiv Order Manager Presents Bundle Inventory
- Inventory - Transfers Tab
- Stock Edit History Export
- Stock Location - Inventory Management Functionality
- Bulk Inventory Reconciliation
- Strict FIFO
- Viewing Stock Edit History
-
Purchase Orders
- How to Create a Manual PO
- Auto POs + Reorder Rules
- Searching for POs
- How can I delete a line item from a purchase order?
- Updating PO Number Prefix
- How to Automate Purchase Orders (Auto-POs)
- Paste from CSV - PO Import
- Understanding Purchase Order (PO) Statuses
- Authorizing a P.O.
- Canceling a P.O.
- Printing a P.O.
- Receiving a P.O.
- Re-Sending a PO
- Voiding a P.O.
- Working with PO Milestones
- Restoring a PO
- Available Actions for a PO
- Exporting POs
-
Shipments
- Printing End of Day Forms
- How do I print an End of Day form or Package Level Detail report for UPS shipments?
- Searching for Shipments
- Printing Shipping Labels
- Tracking Shipments
- Voiding Shipments
- Exporting Shipments
- Postal Zones
- Shipments - Resending Confirmation Emails
- RMA Exports
- Parcel API Launch for Extensiv Brands
- Customers
-
Products
- Adjusting Master SKUs
- How to Disable Inventory Updates for a Specific Sales Channel
- How to Enable Extensiv Order Manager to Automatically Calculate Order Weight Based on Product Weight
- How to Reassign a Listing SKU to Another Product
- Search For Products
- How to Manage Products
- How to Import Your Vendor Products
- Associating a Listing SKU to a Master SKU
- How does Extensiv Order Manager handle variations of the same product?
- Creating Core Products in the App
- Creating Vendor Products in the App
- Creating Product Variations Through the UI
- Creating Listing SKUs through the UI
- Creating Bundles/Kits Through the UI
- Custom Bundle/Kit Export
- Custom Product Fields
- Creating Products via Spreadsheet
- Creating Vendor Products in Bulk (Via Spreadsheet)
- Creating Products through the UI
- Creating Listing SKUs in Bulk (via Spreadsheet)
- Product Creation FAQ
- Exporting Products
- Instructional Video - Master Product Spreadsheet
- Managing Digital SKUs
- Analytics
-
Settings
-
General
- Configuring Shipping Presets
- Update My Profile
- Disable the Inventory Update From Extensiv Order Manager to All Sales Channels
- How to Enable Out of Stock Control for eBay Sales Channels
- Company Info and Additional Account Settings
- Installing an App from the Order Manager App Store
- How to View Your Extensiv Order Manager Invoices
- How To Remove an App in Order Manager
- Ruby Has 3PL Integration
- Company Time Zone Setting
- Tax Identifiers
-
Sales Channels
- Deactivating a Sales Channel
- Editing Sales Channels
- Enable or Disable Extensiv Order Manager Email Notifications to Your Customers
- Shopify Tags
- Shopify Locations
- Amazon Cancellation Settings
- Steps in Adding Walmart as a Sales Channel
- Adding Newegg as a Sales Channel
- Adding eBay as a Sales Channel
- Viewing a Sales Edit Channel's History
- Reactivating Sales Channels
- Adding Amazon as a Sales Channel
- Adding Shopify as a Sales Channel
- Adding a Manual Sales Channel
- Adding Sales Channels
- Assigning a Packing Slip and/or Email Template to your Sales Channel
- How to Exclude a Warehouse From Pushing Inventory to a Sales Channel
- Setting Up Shipment & Carrier Mappings for Your Sales Channels
- Amazon Pacific Time Orderbot Setting
- Walmart Fulfillment Services - WFS
- WFS Workflow
-
Webhooks
- Order Creation Webhook
- Shopify Cancellation Webhook
- Shopify Refund Webhook - POS Orders
- Shopify Fulfillment Webhook
- Shopify Refund Webhook (e-commerce Orders)
- Shopify Product Deletion Webhook
- BigCommerce Webhook
- Shopify Product Update / Product Edit Webhook
- Shopify Auto-Subscribing Webhooks
- Order Payment Webhook
-
Shipping Providers
- Adding FedEx as a Shipping Provider
- How to Add Express 1 as a Shipping Provider
- Adding Amazon Buy Shipping as a Shipping Provider
- UPS Mail Innovations Services
- Adding DHL eCommerce as a Shipping Provider
- FedEx ETD
- Deactivate or Reactivate a Shipping Provider
- Adding Shipping Providers
- Customizing Shipping Services and Package Types Per Shipping Provider
- Vendors
-
Warehouses & Vendors
- Creating and Configuring Warehouses in Extensiv Order Manager
- Can I have additional order information populated on my Shipping label?
- Configuring Shipping Label Print Format Options
- Inventory Dependent Warehouses
- How to Configure the Order Export File for FTP Connections
- Deactivating a Warehouse in Extensiv Order Management
- Updating the Address/Return Address for Your Warehouse
- Search for Vendors
- Configuring a Dropship Vendor
- Creating an In-House Warehouse
- How do I connect Extensiv Order Manager with Deliver?
- Configuring Dropship Vendor FTP
- FTP Inventory Import for a 3PL
- Setting Up Domestic Backup Warehouses
- Setting Up a Warehouse's International Rank
- Pick List Settings
- Setting Up a 3PL Warehouse
- Setting Up Document Print Settings
- Setting a Dropship Template and Fulfilling Orders with a P.O.
- Use Component Inventory Setting for Bundles and Kits
- Instructional Video - Creating Warehouses & Warehouse Settings
-
Orderbots
- Orderbots - Complete List of Filters & Actions
- Postal Zones in Extensiv Order Manager
- Automating Orders to Fulfill from a Specific Warehouse
- Editing an Orderbot
- Deactivating an Orderbot in Extensiv Order Manager
- Mark Order as Shipped Orderbot
- Replace Address Orderbot
- Creating an Orderbot
- Support for Shopify's Additional Details
- Orderbots filtered by zip code range
- Adding Order Item to Order Orderbot Action
- Commonly Used Orderbots
- Understanding Apply Best Rate vs Cheapest Rate Orderbots
- Orderbot: Set order weight and dimensions based on products
- Orderbot: Using Hold the order for and Mark Order as Shipped
- Templates
-
General
- API
- API Integrations
- Accessing and Navigating Order Manager
- Error Messages
-
Order Manager
- Formatting Order Information When Shipping to US Territories
- Endicia's pay-on-use return labels?
- Integrating Endicia
- What are Orderbots?
- How To Set Up Shipments Import
- Setting Up Billing/Inventory Allocation Zones
- Reactivating an Orderbot
- [FAQ] What other Amazon marketplaces do you integrate with?
- Enable Shopify POS
- Adding BigCommerce as a Sales Channel
- Does Order Manager Support Amazon Buy Shipping?
- Error: "The Shippers shipper number cannot be used for the shipment"
- Shopify POS Location Capture and Orderbot
- Edit Shopify Order Items
- Order Export Configuration in the UI- Complete List of Order Export Fields
- Error Message “Invalid Customs Item Data”
- FBA to FBM Conversions - Amazon North America Remote Fulfillment with FBA Sellers
- Where does Extensiv Order Manager determine Inventory Value and COGS from?
- BigCommerce Order Statuses
- Brexit for UK Inventory & Shipments
- Customer Experience Upgrades
- Addressing missing Snapshot Data on July 9, 2023
-
Popular Articles
- Accounting Integrations
Creating and Receiving an RMA
Return Merchandize Authorizations (RMAs) keep record of product returns, produce/email a return shipping label, and dictate how you want the returned inventory to be handled.
How To Create an RMA
- Navigate to the Orders module.
- On the Search/Filter pane on the left, select the Shipped status dropdown view, and select a sub-status to view orders that have already been shipped.
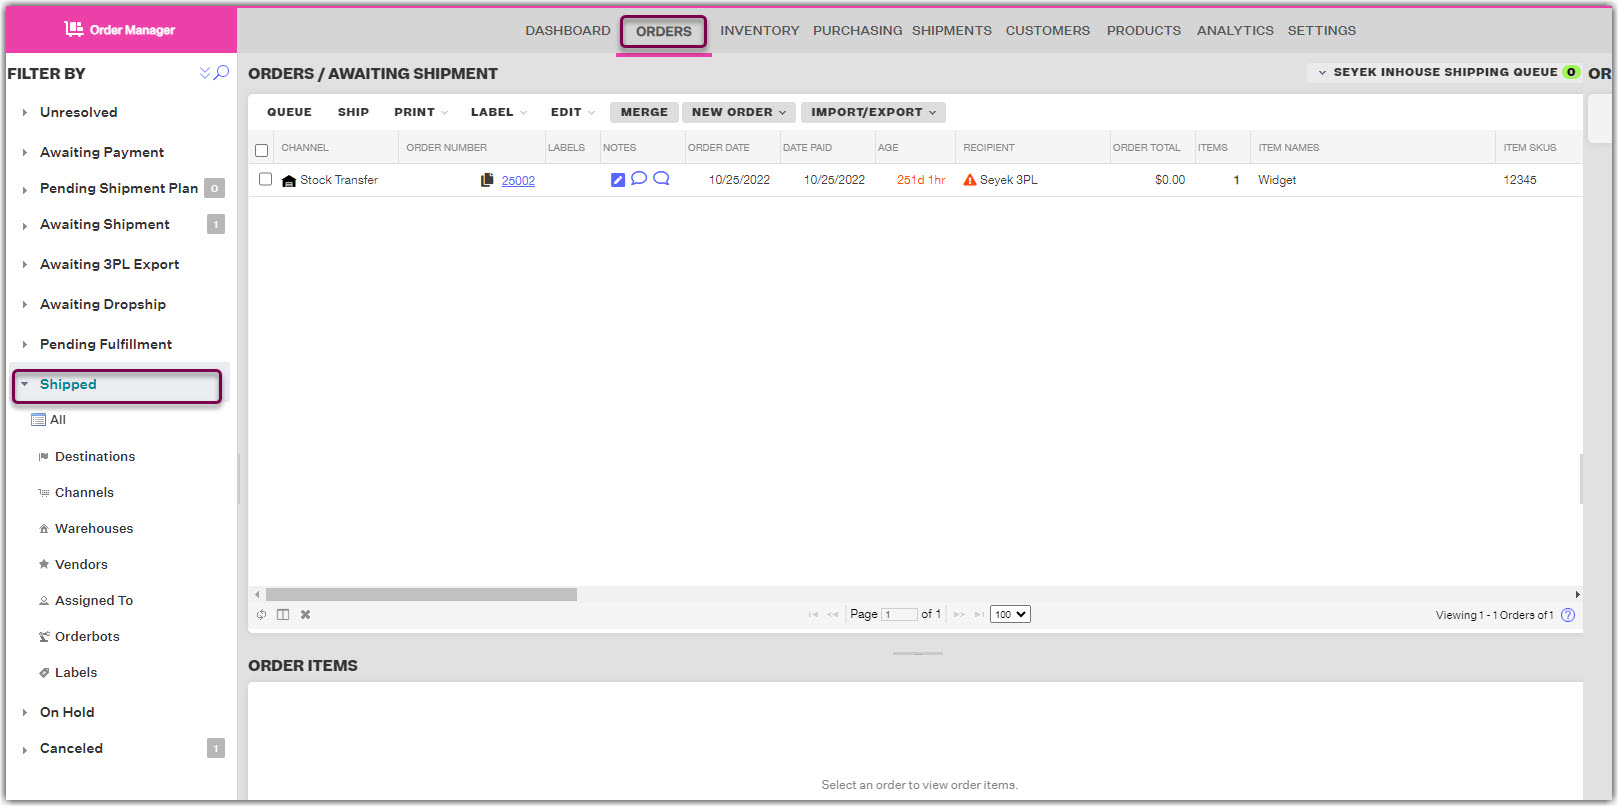
3. In the results viewing pane, select the row or checkbox of the order that you want to create an RMA for, then click Create RMA.

4. In the Create RMA window, be sure to select the correct Return To location for the order. The options you see in this dropdown menu are based on the Active Warehouses you have in the Settings Module, as the menu will show the Returns Location for each. This setting will determine which warehouse Extensiv Order Manager associates the return with as well as the shipping address on the return shipping label (if you choose to include a return label).
5. You can create an RMA with or without a return shipping label. You indicate this through the checkmark box stating This RMA includes a shipping label. The information required to make the RMA will vary depending on whether or not you include the shipping label. If you do not select this option, you can skip to Step 6.
If you choose to include a return shipping label, you can choose whether or not you'd like to email someone the return label. If you'd like to email the return label, the checkbox Email Label? needs to be enabled. An email address to send the return label is also required. The return shipping label will be emailed when the RMA is completed.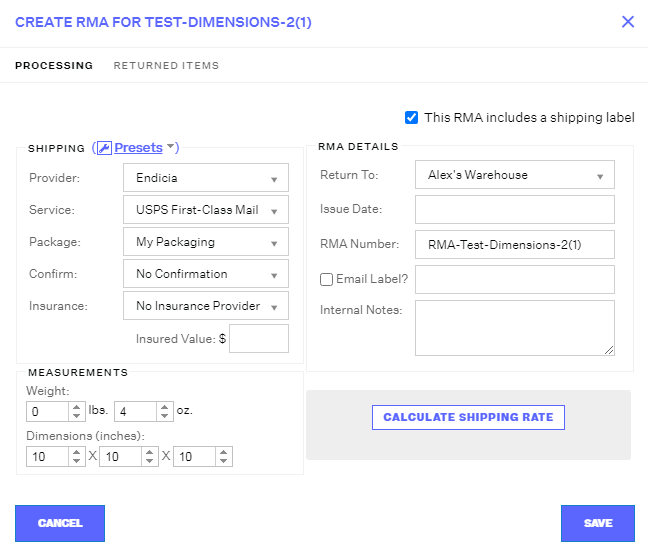
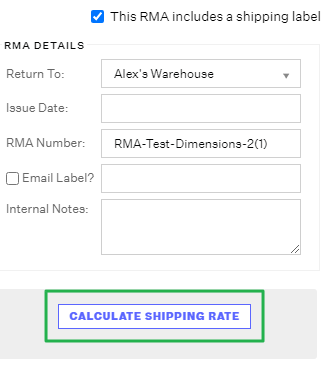
Enter all required Shipping & Measurement information if you are including a shipping label. Click Calculate Shipping Rate to rate the return shipment.
NOTE
The settings in the Processing tab will NOT be able to be edited once the RMA is saved, except for the Internal Notes.
6. Click the Returned Items tab and select the items for return from the list. Be sure to select both the correct product(s) and the quantity being returned.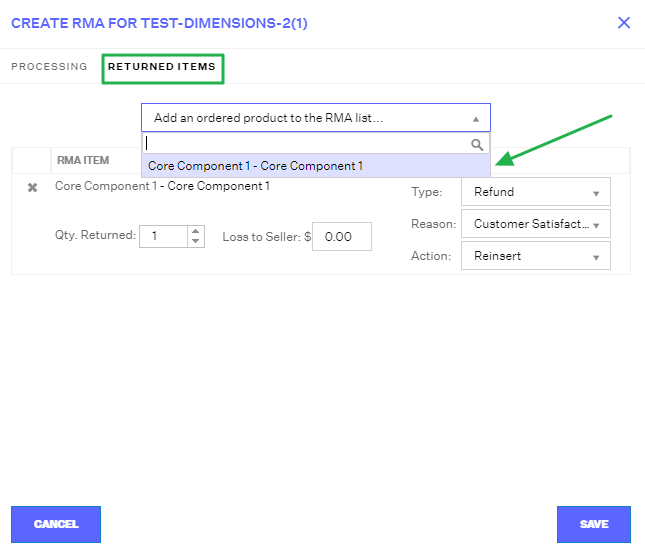
Then indicate how you want the returned item(s) to be handled within Extensiv Order Manager. The Type and Reason are for recording purposes only, while the Action setting will directly determine what happens to the inventory counts when the RMA is "Received". Setting the Action to "Write Off" will result in no inventory adjustments, while selecting one of the "Reinsert" options will result in the returned units being added back to On Hand stock at the "Return To" Warehouse once the RMA is Received.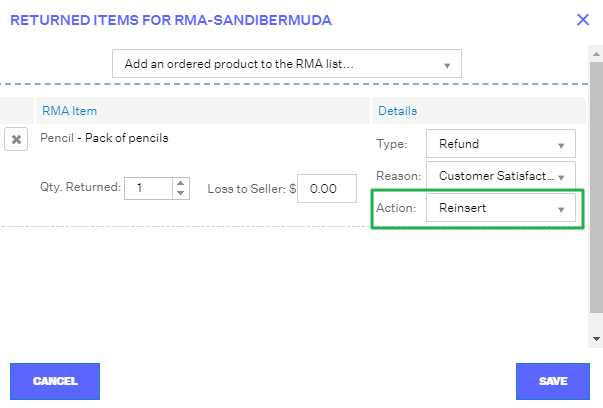
7. Click Save.
How To Receive an RMA
1.In the Shipments Module, go to the Search/Filter pane on the left and select the Returns dropdown view, and select the relevant warehouse or use the Search option to search Returns for a particular RMA.

2. Once you've located your RMA, you can edit the items that are going to be received as well as what Action they will have by clicking the RMA Number hyperlink. You can indicate a Loss to Seller amount as well.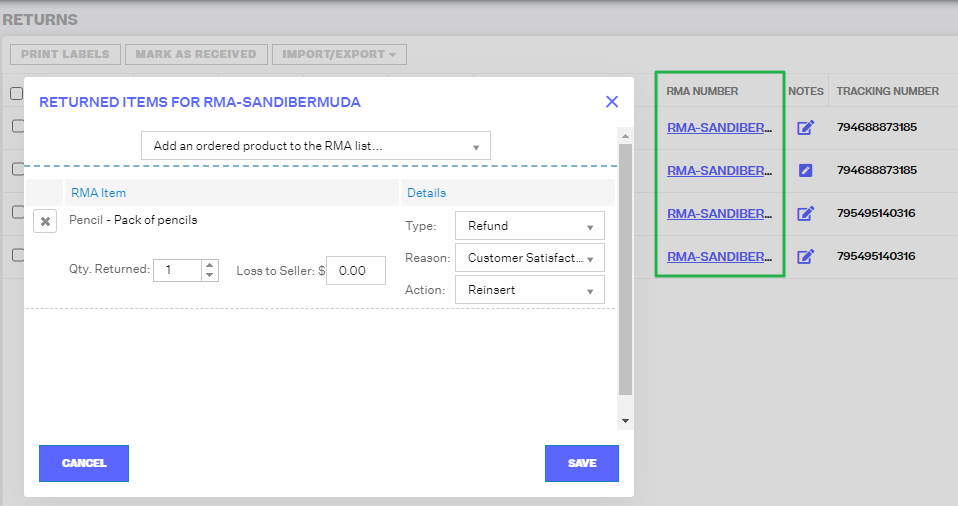
Note
Extensiv Order Manager does not issue refunds to your customers. Any indication of a refund for a return or exchange is strictly for record-keeping purposes only.
3.Once the Returned Items information is finalized, you can choose to generate the return shipping label if it's needed by selecting the row/checkbox of your RMA and then click the Print Labels button.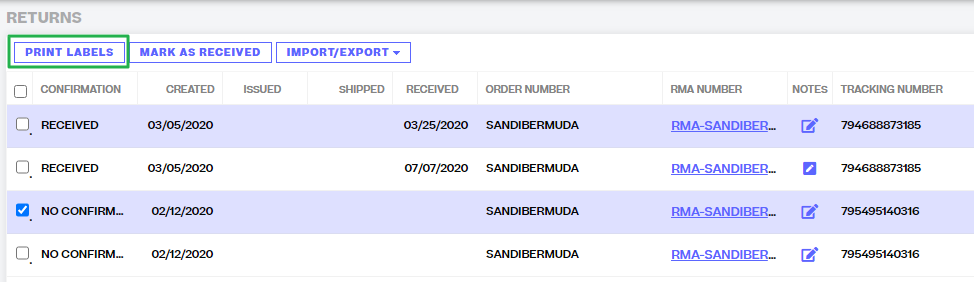
4. Finally, once a return has been received at your Returns warehouse, or once you want to "close out" an RMA (ie: if the customer will not be shipping the item back), select the RMA row/checkbox and then click the Mark as Received button. You will be prompted with a confirmation window which reminds you that Inventory will be handled according to the "Action" indicated in the Returned Items window.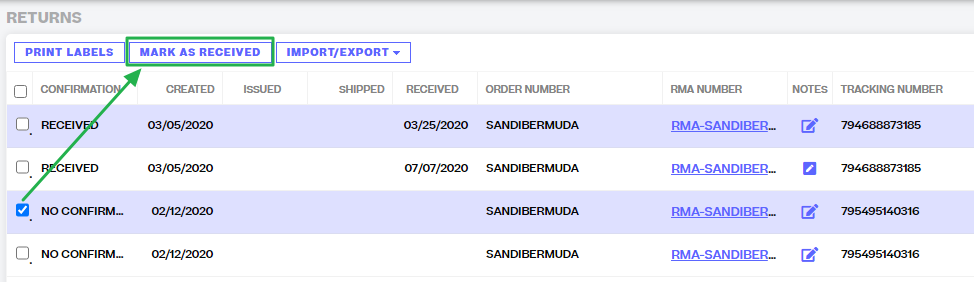
Once you confirm, your RMA will be "Received" which is indicated in the "Confirmation" column. If you selected the "Reinsert" Action option, your product will have been added to the On Hand inventory count at the Return To/Return Location warehouse.