-
Settings
-
General
- Configuring Shipping Presets
- Update My Profile
- Disable the Inventory Update From Extensiv Order Manager to All Sales Channels
- How to Enable Out of Stock Control for eBay Sales Channels
- Company Info and Additional Account Settings
- Installing an App from the Order Manager App Store
- How to View Your Extensiv Order Manager Invoices
- How To Remove an App in Order Manager
- Ruby Has 3PL Integration
- Company Time Zone Setting
- Tax Identifiers
-
Sales Channels
- Deactivating a Sales Channel
- Editing Sales Channels
- Enable or Disable Extensiv Order Manager Email Notifications to Your Customers
- Shopify Tags
- Shopify Locations
- Amazon Cancellation Settings
- Steps in Adding Walmart as a Sales Channel
- Adding Newegg as a Sales Channel
- Adding eBay as a Sales Channel
- Viewing a Sales Edit Channel's History
- Reactivating Sales Channels
- Adding Amazon as a Sales Channel
- Adding Shopify as a Sales Channel
- Adding a Manual Sales Channel
- Adding Sales Channels
- Assigning a Packing Slip and/or Email Template to your Sales Channel
- How to Exclude a Warehouse From Pushing Inventory to a Sales Channel
- Setting Up Shipment & Carrier Mappings for Your Sales Channels
- Amazon Pacific Time Orderbot Setting
- Walmart Fulfillment Services - WFS
- WFS Workflow
-
Webhooks
- Order Creation Webhook
- Shopify Cancellation Webhook
- Shopify Refund Webhook - POS Orders
- Shopify Fulfillment Webhook
- Shopify Refund Webhook (e-commerce Orders)
- Shopify Product Deletion Webhook
- BigCommerce Webhook
- Shopify Product Update / Product Edit Webhook
- Shopify Auto-Subscribing Webhooks
- Order Payment Webhook
-
Shipping Providers
- Adding FedEx as a Shipping Provider
- How to Add Express 1 as a Shipping Provider
- Adding Amazon Buy Shipping as a Shipping Provider
- UPS Mail Innovations Services
- Adding DHL eCommerce as a Shipping Provider
- FedEx ETD
- Deactivate or Reactivate a Shipping Provider
- Adding Shipping Providers
- Customizing Shipping Services and Package Types Per Shipping Provider
- Vendors
-
Warehouses & Vendors
- Creating and Configuring Warehouses in Extensiv Order Manager
- Can I have additional order information populated on my Shipping label?
- Configuring Shipping Label Print Format Options
- Inventory Dependent Warehouses
- How to Configure the Order Export File for FTP Connections
- Deactivating a Warehouse in Extensiv Order Management
- Updating the Address/Return Address for Your Warehouse
- Search for Vendors
- Configuring a Dropship Vendor
- Creating an In-House Warehouse
- How do I connect Extensiv Order Manager with Deliver?
- Configuring Dropship Vendor FTP
- FTP Inventory Import for a 3PL
- Setting Up Domestic Backup Warehouses
- Setting Up a Warehouse's International Rank
- Pick List Settings
- Setting Up a 3PL Warehouse
- Setting Up Document Print Settings
- Setting a Dropship Template and Fulfilling Orders with a P.O.
- Use Component Inventory Setting for Bundles and Kits
- Instructional Video - Creating Warehouses & Warehouse Settings
-
Orderbots
- Orderbots - Complete List of Filters & Actions
- Postal Zones in Extensiv Order Manager
- Automating Orders to Fulfill from a Specific Warehouse
- Editing an Orderbot
- Deactivating an Orderbot in Extensiv Order Manager
- Mark Order as Shipped Orderbot
- Replace Address Orderbot
- Creating an Orderbot
- Support for Shopify's Additional Details
- Orderbots filtered by zip code range
- Adding Order Item to Order Orderbot Action
- Commonly Used Orderbots
- Understanding Apply Best Rate vs Cheapest Rate Orderbots
- Orderbot: Set order weight and dimensions based on products
- Orderbot: Using Hold the order for and Mark Order as Shipped
- Templates
-
General
Setting up Packing Slip Templates
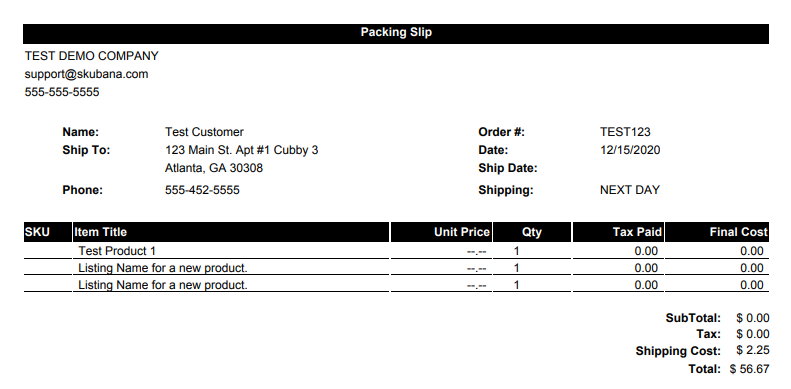
Users can customize the Packing Slip that gets printed from the order(s) received for in-house fulfillment.
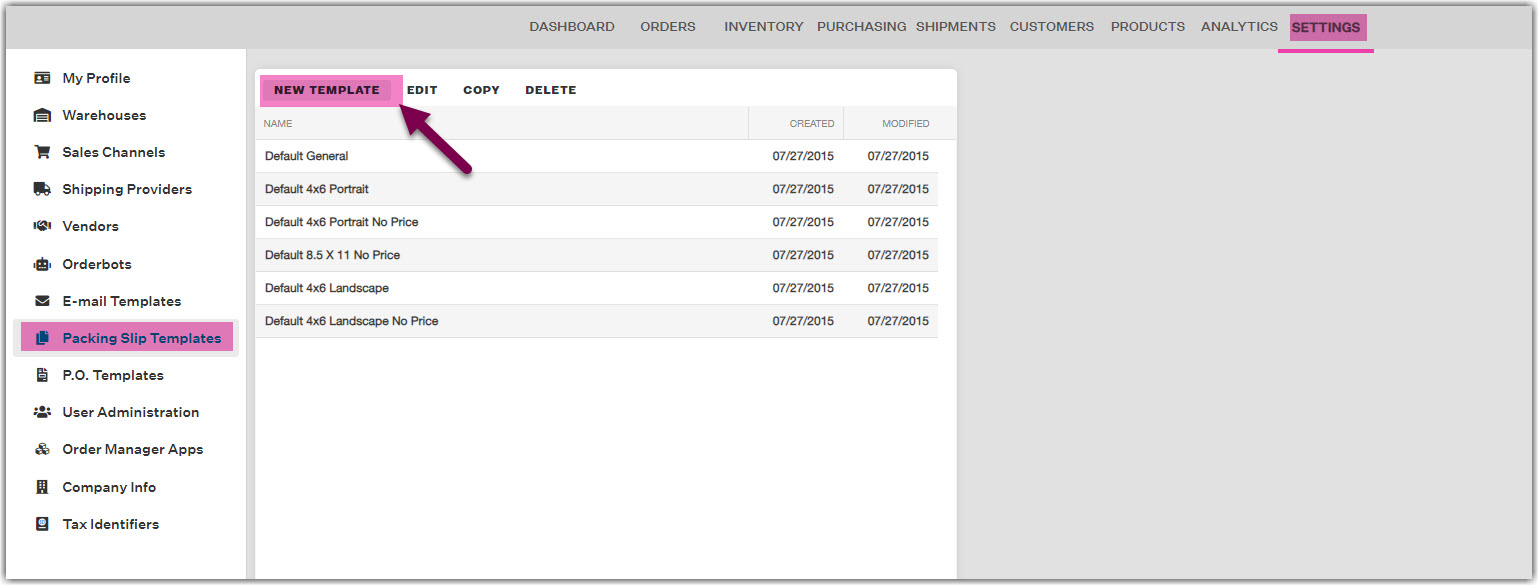
To begin, go to the Settings module and click on “Packing Slip Templates” in the left-hand side menu. Every account comes pre-loaded with a default template that cannot be edited or deleted. These defaults can be copied and saved as a new template to edit from there. Templates can also be built from scratch. To do so, click on “+ New Template” to start fresh.
Remember that packing slip print size and additional details about how content is printed on a packing slip are determined in Document Print Settings, which you can read more about here.

Unlike the email templates section, the packing slip templates come preloaded with six different templates to accommodate for the different sizes of packing slips. As a reminder, these can be set up as in your Document Print Settings in the warehouse settings section. These are:
- Default 4” x 6” Portrait: for one packing slip at a time in portrait. Best for use with a thermal printer.
- Default 4” x 6” Portrait No Price: the same as 4” x 6” Portrait just without the price included.
- Default 4” x 6” Landscape: for one packing slip at a time in landscape. Best for use with a thermal printer.
- Default 4” x 6” Landscape No Price: the same as 4” x 6” Landscape just without the price included.
- Default 8.5” x 11” No Price: for use with 8.5” x 11” full sheet paper. Can use with any printer.
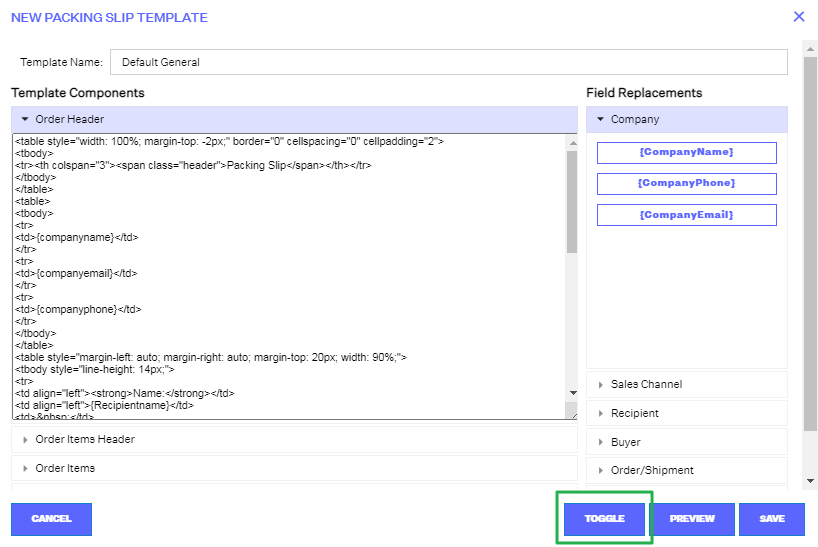
Similar to email templates, within the packing slip template edit window, users can format the template by re-typing the messages and inserting any of the desired Field Replacements on the right. The information will be filled in once the packing slip is generated by pulling the data indicated in the WYSISWYG (what you see is what you get) box.

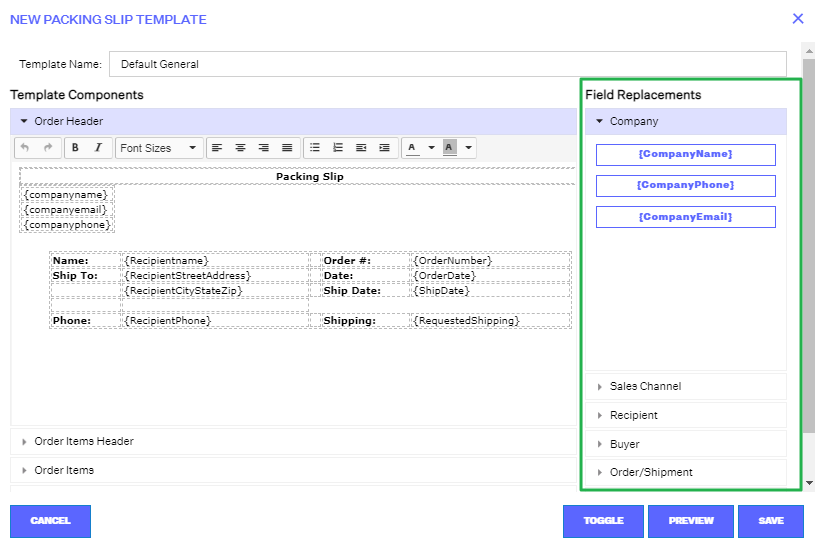
The Field Replacements options here are split into seven sections:
- Company
- Sales Channel
- Recipient
- Buyer
- Order/Shipment
- Order Items
- Barcode Image
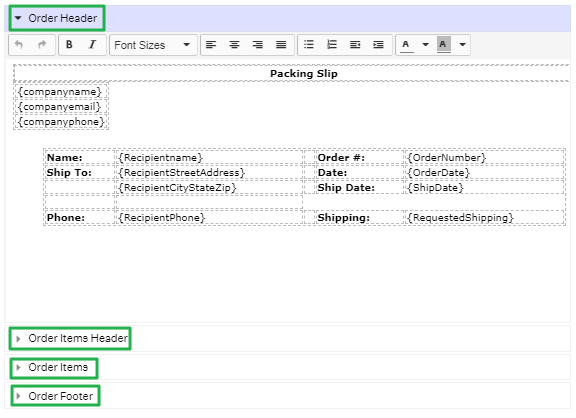
The Packing Slip Template itself is also broken up into four portions:
- Order Headers
- Order Items Headers
- Order Items
- Order Footer (which can also be pre-populated by adding in the communication settings under the Settings- Sales Channels section)
For more advanced users, the templates support editing using HTML by clicking the “<> Toggle” button on the bottom of the window. Field replacements will insert using the {curly brace} syntax into this view as well.
These templates can be previewed by clicking on the “Preview” button in the bottom menu bar.
Please note
not all the fields will populate in the preview such as the image as it must be connected to an actual order for it to pull the image.