-
Shipping Operations
- Order Creation
- Order Management
-
Shipping Setups
- Configuring a Drop Ship Address
- Managing Ship-to Contacts
- Managing Retailers
- Importing Ship-to Contacts
- Managing Ship Method Mappings
- Managing 3rd-Party-Billing Contacts
- Using a Flat File Carrier Integration
- Configuring Zebra Browser Print
- Connecting Multiple Accounts for the Same Carrier
- Managing Shipping Carriers
- Configuring Fulfillment Invoicing
- Managing Carrier Accounts
- Understanding Carrier Account Logic
- Configuring Small Parcel Settings
- Using Address Validation
- Connecting Carriers to Providers
- Understanding the Parcel API
- Shipping Hazardous Materials
-
Small Parcel Carriers
- Shipping with FedEx One Rate®
- Shipping with UPS
- Shipping with UPS Mail Innovations®
- Shipping with DHL eCommerce
- Shipping in Small Parcel Suite
- Shipping with Amazon Buy
- Shipping with APC
- Shipping with DHL Express (US)
- Shipping with USPS (Endicia)
- Shipping with FedEx
- Shipping with FirstMile
- Shipping with OnTrac
- Shipping with USPS (Stamps.com)
- Shipping with Globegistics
- Shipping with RR Donnelley
- Shipping with SEKO Ecommerce
- Shipping with Australia Post
- Shipping with Canada Post
- Shipping with Canpar
- Shipping with Purolator
- Shipping with DHL Express (AU)
- Shipping with Landmark
- Shipping with PARCLL
- Shipping with ePost Global
- Shipping with USPS (BUKU Ship)
- Shipping with USPS (Pitney Bowes Expedited)
- Shipping with Pitney Bowes Cross-Border Delivery
- Shipping with Stallion Express
- Shipping with Pitney Bowes Standard
- Shipping with Sendle
- Shipping with Passport
- Shipping with Tusk Logistics
- Shipping With Flexport
- Connecting Small Parcel to UPS
- Packing Basics
-
Order Processing
- Voiding Shipping Labels
- Creating End of Day Requests (Manifesting)
- Using High Volume Processing (HVP) with SmartParcel
- Navigating the Small Parcel Homepage
- Shipping in the Small Parcel Space
- Packing in the Small Parcel Space
- Printing Combo Labels
- Printing Return Labels
- Troubleshooting Blank Shipping Labels
- Billing Best Practices for Shipping
- International Shipping
Using Packing Materials
In order to access this feature, you need to have it enabled by your CSM.
This article explains how to use the Packing Materials feature. See our article Understanding Packing Materials to learn more about how this feature works.
Navigating to Packing Materials
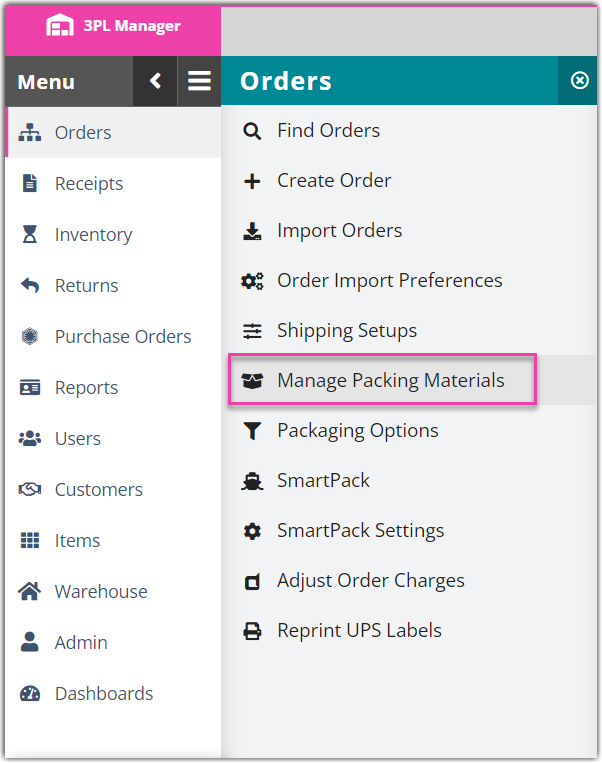
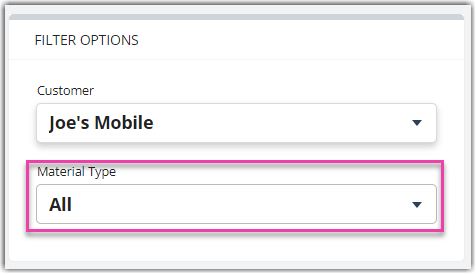
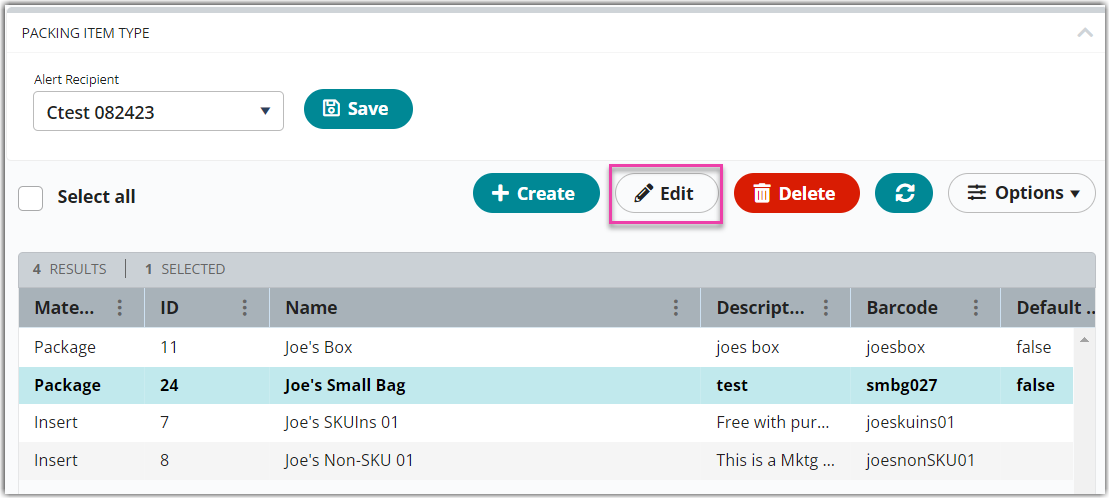
You can manage and configure packing materials from Orders > Manage Packing Materials. The grid can be filtered by selecting the material type with the Material Type drop-down menu. The packing material’s filters are accessed by selecting an order from the grid and clicking the Edit button to open the Edit Packing Definition window.
1. Go to Orders > Manage Packing Materials.
2. Filter the grid by selecting the material type with the Material Type drop-down menu.
3. Select an order and click the Edit button.
4. Set your desired insert filters in the Edit Packing Definition window.
System Rules
By default, the insert quantity is one. The “System Rules” section of the “Edit Packing Definitions” window includes the option “Insert quantity matches item quantity.” Selecting this option adds the same amount of inserts as ordered items.
Insert filters
Insert definitions support several optional filters to determine if an order qualifies for a given insert.
All inserts require an assigned customer. If none of the trigger fields are filled in at all, the row should always generate an insert.
- Lifespan: The insert lifespan defines the time period during which the insert definition is active. If an insert definition has a lifespan, orders qualify for it only if the order’s Created Date falls within the insert's lifespan. Set the lifespan by specifying a Start Date and/or an End Date.
- Ignore for EDI orders: If an insert definition has Ignore for EDI orders checked, orders qualify for it only when they were not created via a native 3PL Warehouse manager EDI connection. This lets you exclude B2B orders from getting inserts intended for consumers.
- Trigger Item: If an insert definition has one or more Trigger Items, orders qualify for it only if the order includes one of those trigger items.
- Shipping Destination: If an insert definition includes Country and State/Province/Region filters, orders qualify for inserts only when their Ship to Address matches the selected filter values.
- Order Source(IM Cart Name): When enabled, incoming orders qualify for the insert only if they were imported through the specified shopping cart connection.
Note: This filter only supports connections originating from Extensiv Integration Manager. Native 3PL Warehouse Manager connections are not supported.
3PL Warehouse Manager evaluates orders against those filers in the following way: Customer AND Lifespan AND EDI AND (Trigger Item OR Destination OR Cart Name).
Setting up Inventory Alerts
Manage Packing Materials lets you configure in-app inventory alerts for both Package definitions and non-SKU insert definitions. Once configured, you will receive an alert the next time you login after the inventory depletes below the defined minimum value.
To configure inventory alerts:
- From the Packing Materials home page, Create a new insert or Edit an existing insert.
- In the Create/Edit Packing Definition window, configure the appropriate fields in the Inventory section.
- Warehouse: Select the warehouse where this inventory configuration applies.
- Alert Recipient: Select the warehouse user that should receive the in-app inventory alerts for this package or insert. By default, the system users the global alert recipient, if defined, but you can override this user with another if desired.
- Current Quantity: Specify the quantity of this package or insert that is currently on hand in the selected warehouse. The system automatically decrements this value each time an order is closed (shipped) that uses this package or insert.
- Min Quantity: Specify the quantity at which the alert recipient should start receiving alerts saying it’s time to restock this package or insert.
- Add Another Warehouse: If you have multiple warehouses, click to add another warehouse section so you can configure the alert settings for each warehouse independently.

- Warehouse: Select the warehouse where this inventory configuration applies.
- Click Save.