-
Shipping Operations
- Order Creation
- Order Management
-
Shipping Setups
- Configuring a Drop Ship Address
- Managing Ship-to Contacts
- Managing Retailers
- Importing Ship-to Contacts
- Managing Ship Method Mappings
- Managing 3rd-Party-Billing Contacts
- Using a Flat File Carrier Integration
- Configuring Zebra Browser Print
- Connecting Multiple Accounts for the Same Carrier
- Managing Shipping Carriers
- Configuring Fulfillment Invoicing
- Managing Carrier Accounts
- Understanding Carrier Account Logic
- Configuring Small Parcel Settings
- Using Address Validation
- Connecting Carriers to Providers
- Understanding the Parcel API
- Shipping Hazardous Materials
-
Small Parcel Carriers
- Shipping with FedEx One Rate®
- Shipping with UPS
- Shipping with UPS Mail Innovations®
- Shipping with DHL eCommerce
- Shipping in Small Parcel Suite
- Shipping with Amazon Buy
- Shipping with APC
- Shipping with DHL Express (US)
- Shipping with USPS (Endicia)
- Shipping with FedEx
- Shipping with FirstMile
- Shipping with OnTrac
- Shipping with USPS (Stamps.com)
- Shipping with Globegistics
- Shipping with RR Donnelley
- Shipping with SEKO Ecommerce
- Shipping with Australia Post
- Shipping with Canada Post
- Shipping with Canpar
- Shipping with Purolator
- Shipping with DHL Express (AU)
- Shipping with Landmark
- Shipping with PARCLL
- Shipping with ePost Global
- Shipping with USPS (BUKU Ship)
- Shipping with USPS (Pitney Bowes Expedited)
- Shipping with Pitney Bowes Cross-Border Delivery
- Shipping with Stallion Express
- Shipping with Pitney Bowes Standard
- Shipping with Sendle
- Shipping with Passport
- Shipping with Tusk Logistics
- Shipping With Flexport
- Connecting Small Parcel to UPS
- Packing Basics
-
Order Processing
- Voiding Shipping Labels
- Creating End of Day Requests (Manifesting)
- Using High Volume Processing (HVP) with SmartParcel
- Navigating the Small Parcel Homepage
- Shipping in the Small Parcel Space
- Packing in the Small Parcel Space
- Printing Combo Labels
- Printing Return Labels
- Troubleshooting Blank Shipping Labels
- Billing Best Practices for Shipping
- International Shipping
Configuring Scales for SmartPack
Postal scales are often used and recommended as part of the packing process to ensure package weights are accurate when generating shipping labels. This article reviews how to configure a postal scale and weigh packages when packing with SmartPack in the Small Parcel space.
Before proceeding, please ensure the following requirements have been met:
- 'SmartPack Scale' is enabled via Admin > Settings
- 'SmartPack – Enable scale' is enabled for each relevant customer via Customers > Manage Customers
- You are using a postal scale that supports data transfer from USB to your computer (Example brands include Dymo, Fairbanks, and Mettler-Toledo)
- You are using Google Chrome V89.0.4 or newer (Scale support uses a browser-based feature that Firefox and Edge have not yet implemented)
- You have a basic understanding of how to pack using SmartPack
- If planning to manually rate shop, you have rate shopping fully configured
Guidelines
- Ensure your scale is turned on and connected to your computer.
- Navigate to the Small Parcel space, then open an order to pack by scanning a relevant value or selecting Pack and Ship from the homepage.
- Once the Pack and Ship dialog is opened, your browser prompts you to connect to a HID device. Select your scale from the list, then click Connect.
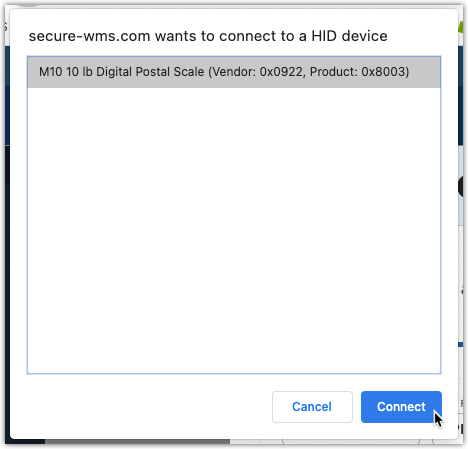
If your scale does not display in the list of devices, it is likely powered off. To resolve, turn the scale on, then close and re-open the Pack and Ship dialog.
- Once the scale is connected to your browser, the 'Current Package Weight' displays above the SmartPack grid with the active package weight.
- Specify a package by scanning the associated barcode or selecting the package type from the 'Add a Package' drop-down list, then place the package on the scale.
- Scan or select an item from the grid, then place the item in the package. Repeat this step until the package is full, then add packing material as needed. If there are no additional packages on the order, continue to Step 9.
- If packing a multi-package order, add a new package type, remove the full package from the scale, then place the new package on the scale.
 When you add a new package to the order, always keep the previous package on the scale until you have added the next package to the order. This ensures SmartPack has time to record the current scale weight for the package you just finished packing.
 - Repeat Steps 6 and 7 until the order is fully packed.
- Finalize the packing process using one of the following options:
- If you are using SmartParcel to print shipping labels, select your label preferences in the SmartParcel container.
- If you have not already determined the carrier and service for rate shopping, click Get Rates to view shipping rates based on the order weight, then select and Save a rate.
- Click Pack and Ship to complete the order processing. Once your shipping labels are printed, the relevant weight is recorded on each label. Affix the labels to each package.
- If you are not shipping with SmartParcel, click Pack to finalize the pack operation.
- If you are using SmartParcel to print shipping labels, select your label preferences in the SmartParcel container.
- Once the pack is complete, the 'Weight' value for this order updates accordingly in the Small Parcel grid. Print packing slips as needed, then close the order.
If you need to reweigh a package on the order, you must delete the relevant packages and repack the items, then print new shipping labels as needed.