-
Shipping Operations
- Order Creation
- Order Management
-
Shipping Setups
- Configuring a Drop Ship Address
- Managing Ship-to Contacts
- Managing Retailers
- Importing Ship-to Contacts
- Managing Ship Method Mappings
- Managing 3rd-Party-Billing Contacts
- Using a Flat File Carrier Integration
- Configuring Zebra Browser Print
- Connecting Multiple Accounts for the Same Carrier
- Managing Shipping Carriers
- Configuring Fulfillment Invoicing
- Managing Carrier Accounts
- Understanding Carrier Account Logic
- Configuring Small Parcel Settings
- Using Address Validation
- Connecting Carriers to Providers
- Understanding the Parcel API
- Shipping Hazardous Materials
-
Small Parcel Carriers
- Shipping with FedEx One Rate®
- Shipping with UPS
- Shipping with UPS Mail Innovations®
- Shipping with DHL eCommerce
- Shipping in Small Parcel Suite
- Shipping with Amazon Buy
- Shipping with APC
- Shipping with DHL Express (US)
- Shipping with USPS (Endicia)
- Shipping with FedEx
- Shipping with FirstMile
- Shipping with OnTrac
- Shipping with USPS (Stamps.com)
- Shipping with Globegistics
- Shipping with RR Donnelley
- Shipping with SEKO Ecommerce
- Shipping with Australia Post
- Shipping with Canada Post
- Shipping with Canpar
- Shipping with Purolator
- Shipping with DHL Express (AU)
- Shipping with Landmark
- Shipping with PARCLL
- Shipping with ePost Global
- Shipping with USPS (BUKU Ship)
- Shipping with USPS (Pitney Bowes Expedited)
- Shipping with Pitney Bowes Cross-Border Delivery
- Shipping with Stallion Express
- Shipping with Pitney Bowes Standard
- Shipping with Sendle
- Shipping with Passport
- Shipping with Tusk Logistics
- Shipping With Flexport
- Connecting Small Parcel to UPS
- Packing Basics
-
Order Processing
- Voiding Shipping Labels
- Creating End of Day Requests (Manifesting)
- Using High Volume Processing (HVP) with SmartParcel
- Navigating the Small Parcel Homepage
- Shipping in the Small Parcel Space
- Packing in the Small Parcel Space
- Printing Combo Labels
- Printing Return Labels
- Troubleshooting Blank Shipping Labels
- Billing Best Practices for Shipping
- International Shipping
Using a Flat File Carrier Integration
In the case that you are processing lower-volume shipments or SmartParcel simply doesn't fit your business needs, Extensiv offers a flat file integration with carrier software (i.e., UPS World Ship, FedEx Ship Manager, Endicia Professional, or Stamps.com desktop) that allows you to generate shipping labels.
This article reviews the process of using a flat file carrier integration to print shipping labels and transfer tracking information and shipping costs back to 3PL Warehouse Manager.
If you don't have an existing flat file carrier integration and are interested in setting one up, please reach out to your Customer Success Manager to begin the engagement process with our Professional Services team.
Step 1: Export carrier flat files
When using a flat file carrier integration, you must first download a file containing the order and package information a carrier needs to generate shipping labels.
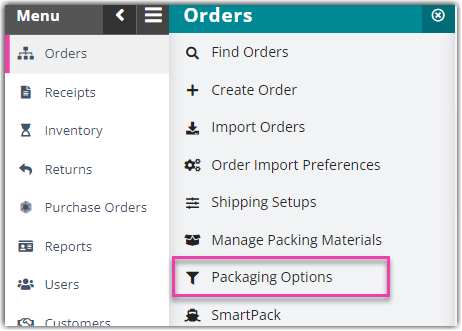
- Navigate to Orders > Packaging Options.
- Under 'Carrier Import/Export', select the appropriate Export for ... option.
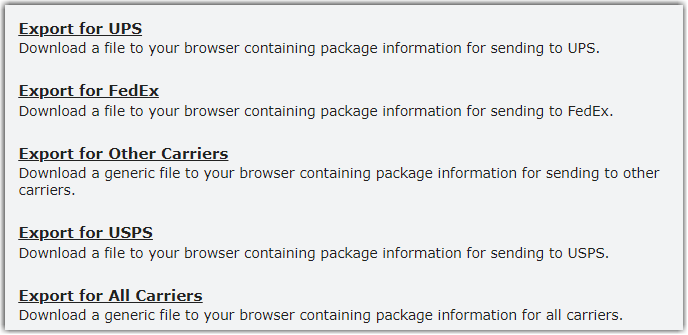
- Depending on your selection, the grid for the specified carrier displays open or complete orders that are fully allocated and have no associated tracking number.
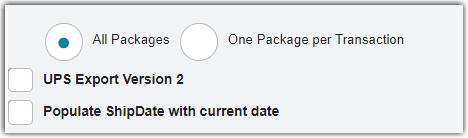
- Make the necessary selections to prepare for export. Each option is defined below.
-
All Packages: If selected, the exported files populate the package data that is captured in the system from packing the order. If you have not packed the order, the system automatically generates package data based on item setup.
-
One Package per Transaction: For the purposes of the export, this option ignores any package data captured in the system and assume all the order contents are in a single package. (This option exists to support workflows where you are defining the package setup in the carrier software rather than 3PL Warehouse Manager.)
-
UPS Export Version 2: This option should not be selected in the SmartView interface.
-
Populate ShipDate with current date: This option is required if utilizing a desktop Stamps.com connection.
-
All Packages: If selected, the exported files populate the package data that is captured in the system from packing the order. If you have not packed the order, the system automatically generates package data based on item setup.
- Select an order from the grid, or use < Ctrl > or < Shift > to select multiple orders, then click Export.
Depending on your browser, you may have to specify whether you'd like to 'open' or 'save' the file. Once you select save, the file(s) download to your device.Please note that the exact location for the file(s) on your device is defined during the engagement process of this integration. If you need assistance finding this location, please contact Support.
- Once you've exported the files, you can generate your shipping labels. The label generation process takes place outside of 3PL Warehouse Manager and varies from carrier to carrier. If you need assistance with generating your shipping labels in the carrier software, please refer to the relevant carrier's help documentation.
- Once you are finished generating your shipping labels, proceed to Step 2.
Step 2: Import tracking and charge data from carrier
After generating your shipping labels, you can import the tracking information and shipping costs into 3PL Warehouse Manager to update the orders.
If your account does not have the Carrier Export function enabled, activating the Tracking Number Import Template may incur additional monthly fees. If you are unsure whether this feature is activated for your account, please contact your CSM for more information.
- Return to the main Packaging Options page.
- Under 'Carrier Import/Export', select Import from UPS or FedEx.
- Click Browse, then double-click the import file located on your device. (If you need assistance finding this location, please contact Support.)
- Click Import. The 'Orders To Be Updated' grid populates with the imported data.
- Once you review the data in the grids for accuracy, click Update Orders to update the specified orders in the system.