-
Shipping Operations
- Order Creation
- Order Management
-
Shipping Setups
- Configuring a Drop Ship Address
- Managing Ship-to Contacts
- Managing Retailers
- Importing Ship-to Contacts
- Managing Ship Method Mappings
- Managing 3rd-Party-Billing Contacts
- Using a Flat File Carrier Integration
- Configuring Zebra Browser Print
- Connecting Multiple Accounts for the Same Carrier
- Managing Shipping Carriers
- Configuring Fulfillment Invoicing
- Managing Carrier Accounts
- Understanding Carrier Account Logic
- Configuring Small Parcel Settings
- Using Address Validation
- Connecting Carriers to Providers
- Understanding the Parcel API
- Shipping Hazardous Materials
-
Small Parcel Carriers
- Shipping with FedEx One Rate®
- Shipping with UPS
- Shipping with UPS Mail Innovations®
- Shipping with DHL eCommerce
- Shipping in Small Parcel Suite
- Shipping with Amazon Buy
- Shipping with APC
- Shipping with DHL Express (US)
- Shipping with USPS (Endicia)
- Shipping with FedEx
- Shipping with FirstMile
- Shipping with OnTrac
- Shipping with USPS (Stamps.com)
- Shipping with Globegistics
- Shipping with RR Donnelley
- Shipping with SEKO Ecommerce
- Shipping with Australia Post
- Shipping with Canada Post
- Shipping with Canpar
- Shipping with Purolator
- Shipping with DHL Express (AU)
- Shipping with Landmark
- Shipping with PARCLL
- Shipping with ePost Global
- Shipping with USPS (BUKU Ship)
- Shipping with USPS (Pitney Bowes Expedited)
- Shipping with Pitney Bowes Cross-Border Delivery
- Shipping with Stallion Express
- Shipping with Pitney Bowes Standard
- Shipping with Sendle
- Shipping with Passport
- Shipping with Tusk Logistics
- Shipping With Flexport
- Connecting Small Parcel to UPS
- Packing Basics
-
Order Processing
- Voiding Shipping Labels
- Creating End of Day Requests (Manifesting)
- Using High Volume Processing (HVP) with SmartParcel
- Navigating the Small Parcel Homepage
- Shipping in the Small Parcel Space
- Packing in the Small Parcel Space
- Printing Combo Labels
- Printing Return Labels
- Troubleshooting Blank Shipping Labels
- Billing Best Practices for Shipping
- International Shipping
Cloning an Order
Cloning an order enables users to create a new order based on an existing one, using it as a template. This eliminates the need to manually fill in all the fields in the order creation form. It’s useful for creating similar orders or resending an order that encountered an issue. If interested, please contact your Customer Success Manager to have this feature turned on for your account.
How to clone an order
- In the Extensiv Sandbox, go to 3PL Warehouse Manager.
- Navigate to Orders, then click Find Orders.
- Select the desired order you wish to clone.
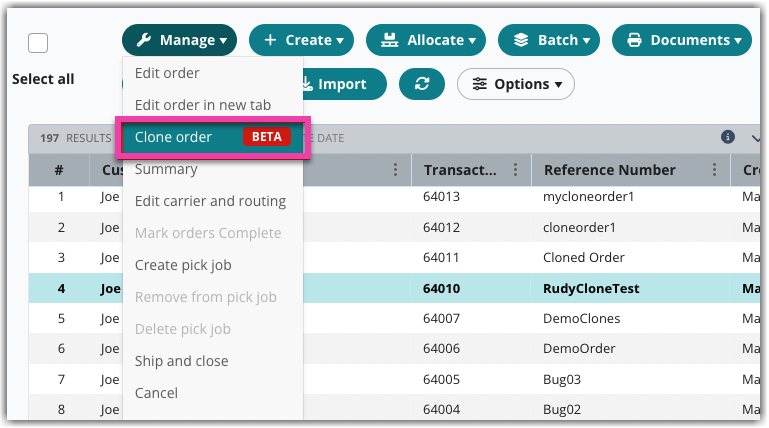
- Click Manage.
- Click Clone Order.
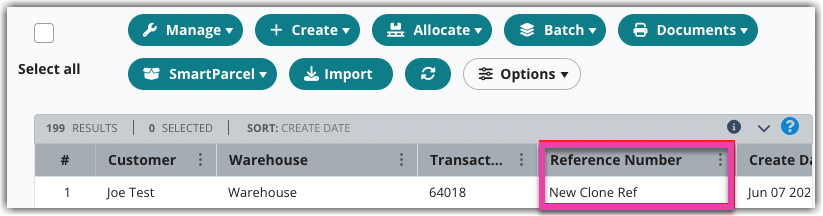
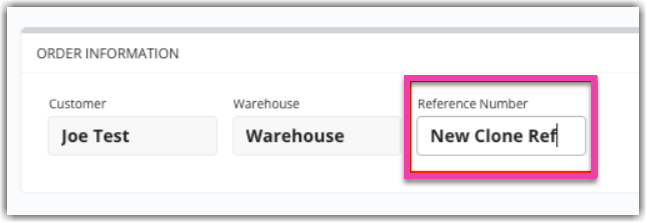
- Enter a new Reference Number. Note that the Customer and Warehouse fields are pre-filled.
Aside from the Reference Number, the following fields are not copied during the cloning process:
- Tracking number
- Load number
- BOL number
- Trailer number
- Seal number
- Door
- Capacity type
- Pickup date
- Order charges
- Order packages
- Custom fields (both order-level and line-item-level)
- Bin numbers
- Click Save. This will direct you to a screen similar to the one used for creating a new order.
- By clicking either Complete or Ship and Close, the newly cloned order will become visible in the Find Orders grid.