Understanding Carrier Account Logic
1.9 min read
|You can set up carrier accounts in multiple locations within 3PL Warehouse Manager. There are a number of factors that come into play when the system designates a specific carrier account to use with SmartParcel, so it is important to understand the logic behind these account setups.
This article reviews the hierarchy and logic of carrier account configurations.
Guidelines
The locations you can set up carrier account logic include the following:
- Small Parcel Space – Settings > Carrier Accounts
- WMS – Customers > Manage Customers > Edit > System
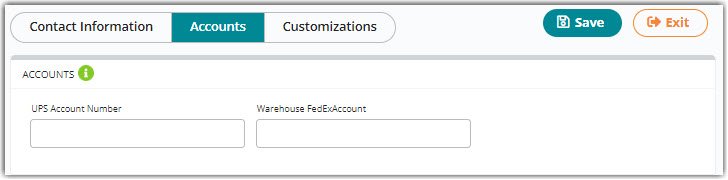
- WMS – Warehouse > Manage Warehouse > Edit > Accounts
The general logic for these setups is as follows:
- If there is a warehouse carrier account and no customer carrier account, the warehouse carrier information applies to orders as the primary account.
- If there is a warehouse carrier account and a separate customer carrier account, the customer account information overrides the shipping account number on any orders for that customer.
- If there is a warehouse carrier account and a separate customer carrier account, then the warehouse has the option (in Manage Customers) to override the billing 'Account Number' field on an order.
Please note that accounts defined on the Manage Customers and Manage Warehouse page must also be configured on the Small Parcel Settings page for this logic to go into effect.
Small Parcel Settings
If you're shipping through SmartParcel, all account setups should start on the Small Parcel Settings page. (If you're not using SmartParcel, you can continue to the next section.) This page allows you to connect carrier accounts for your warehouse and individual customers. There must be a warehouse account configured here to ship with SmartParcel.
Once you have a warehouse account configured on the Small Parcel Settings page, you can also set up carrier accounts for your customers, which triggers that customer's account information to supersede the warehouse account information on that customer's orders.
If you connect multiple customer carrier accounts, additional logic may apply. Please see Connecting Multiple Accounts for the Same Carrier to learn more.
Manage Customers
Under the System configuration section, you can specify your customer's UPS or FedEx information.
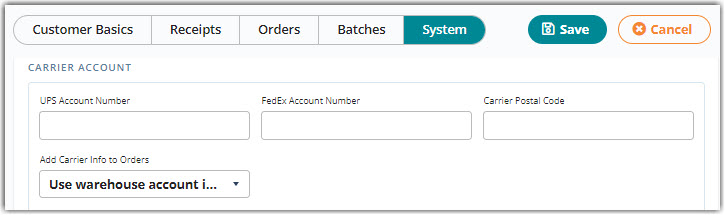
The 'Add Carrier Info to Orders' field allows you to specify which information populates for the billing 'Account Number' on an order:
- Use warehouse account info: The system populates the account information defined on the Manage Warehouse page
- Both Prepaid and Third-Party: The system populates the account information defined here for both prepaid and third-party billing
- Prepaid Only: The system populates the account information defined here for prepaid billing
- Third-Party Only: The system populates the account information defined here for third-party billing
When billing prepaid, the carrier bills shipping charges to the shipper's account. With third-party billing, the carrier bills shipping charges to a party other than the shipper or recipient—if you are shipping an order with SmartParcel and billing third-party, you must have a valid account number and zip code defined in the Carrier and Routing section of the order.
If no carrier accounts are defined on this page and you are shipping with SmartParcel, the logic from the Small Parcel Settings page applies.
Manage Warehouse
Under the Accounts configuration section, you can specify your warehouse's UPS and FedEx information.
This information is applied in two instances:
- If you specify to 'Use warehouse account info' under Manage Customers, and
- If you are billing prepaid with 'Third-Party Only' selected under Manage Customers.