-
Shipping Operations
- Order Creation
- Order Management
-
Shipping Setups
- Configuring a Drop Ship Address
- Managing Ship-to Contacts
- Managing Retailers
- Importing Ship-to Contacts
- Managing Ship Method Mappings
- Managing 3rd-Party-Billing Contacts
- Using a Flat File Carrier Integration
- Configuring Zebra Browser Print
- Connecting Multiple Accounts for the Same Carrier
- Managing Shipping Carriers
- Configuring Fulfillment Invoicing
- Managing Carrier Accounts
- Understanding Carrier Account Logic
- Configuring Small Parcel Settings
- Using Address Validation
- Connecting Carriers to Providers
- Understanding the Parcel API
- Shipping Hazardous Materials
-
Small Parcel Carriers
- Shipping with FedEx One Rate®
- Shipping with UPS
- Shipping with UPS Mail Innovations®
- Shipping with DHL eCommerce
- Shipping in Small Parcel Suite
- Shipping with Amazon Buy
- Shipping with APC
- Shipping with DHL Express (US)
- Shipping with USPS (Endicia)
- Shipping with FedEx
- Shipping with FirstMile
- Shipping with OnTrac
- Shipping with USPS (Stamps.com)
- Shipping with Globegistics
- Shipping with RR Donnelley
- Shipping with SEKO Ecommerce
- Shipping with Australia Post
- Shipping with Canada Post
- Shipping with Canpar
- Shipping with Purolator
- Shipping with DHL Express (AU)
- Shipping with Landmark
- Shipping with PARCLL
- Shipping with ePost Global
- Shipping with USPS (BUKU Ship)
- Shipping with USPS (Pitney Bowes Expedited)
- Shipping with Pitney Bowes Cross-Border Delivery
- Shipping with Stallion Express
- Shipping with Pitney Bowes Standard
- Shipping with Sendle
- Shipping with Passport
- Shipping with Tusk Logistics
- Shipping With Flexport
- Connecting Small Parcel to UPS
- Packing Basics
-
Order Processing
- Voiding Shipping Labels
- Creating End of Day Requests (Manifesting)
- Using High Volume Processing (HVP) with SmartParcel
- Navigating the Small Parcel Homepage
- Shipping in the Small Parcel Space
- Packing in the Small Parcel Space
- Printing Combo Labels
- Printing Return Labels
- Troubleshooting Blank Shipping Labels
- Billing Best Practices for Shipping
- International Shipping
Managing 3rd-Party-Billing Contacts
Third-party-billing contacts are used in 3PL Warehouse Manager to define the contact information of a third-party who is billed for the freight charges on an order. Please be aware that 3rd-Party-Billing is typically used for pallet in/out workflows and large shipments that require Bills of Lading.
This article reviews how to add and edit third-party-billing contacts. The contact information defined on this page is included on the Bill of Lading when shipping third-party for one of the established contacts.
Guidelines
Navigate to Orders > Shipping Setups.
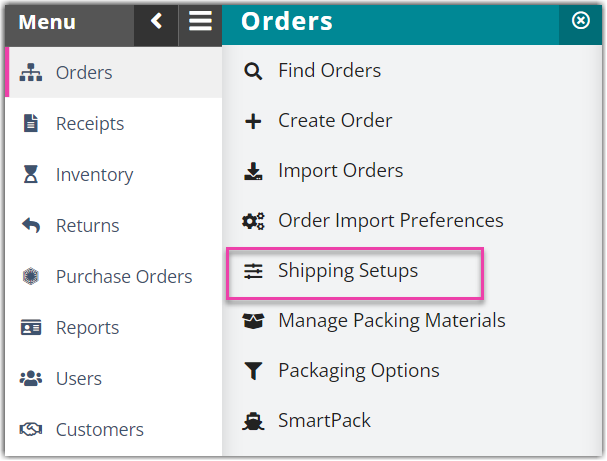
Click Manage 3rd-Party-Billing Contacts.
Select a customer from the drop-down menu. A list of all third-party billing contacts for the specified customer will be displayed in the grid.
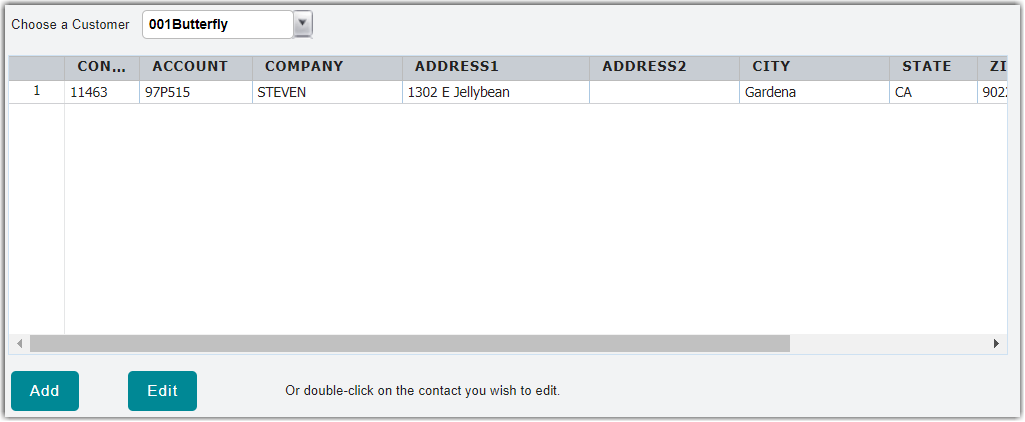
To add a new third-party billing contact in the system, click Add. Fill out the contact information using the appropriate fields. Note that fields with a red asterisk (*) are required. Once complete, click Save. The new third-party billing contact will be displayed in the grid.
Please note that an order's package export file sometimes contains blanks in the 'BillTo' fields. If this is the case, ensure that, under the order's 'Carrier and Routing' section, the 'Billing Type' is specified as BillThirdParty,third-party billing and the 'Account Number' is defined in the third-party billing contact's information.
When preparing the package export file or generating a Bill of Lading, the system will match the account number in the order with the account numbers in the customer's third-party billing contacts. If a match is found, the system puts the contact information in the 'BillTo' fields of the export file or the third-party-billing contact on the Bill of Lading.
To edit an existing third-party billing contact, select the contact from the grid, then click Edit. Make your changes, then click Save.