-
Order Routing Management
-
Orders
- Apply Actions to Existing Orders in Bulk
- Custom Fields for Orders (Custom Columns)
- Duplicate or Clone an Order
- Customizing the organization of Columns in the Orders Module
- Resolving an Order in Missing Product Information Status
- Restoring a Canceled Order
- Cancel an Order
- Restore an On-Hold Order
- Creating a Manual Order
- Out of Stock Orders
- Creating a Manual Order - Single or Bulk
- Manually Mark an Order as Shipped - Individually or in Bulk
- Export an Order to a 3PL
- Validating Shipping Addresses
- Missing Order Info
- Importing Orders Via Spreadsheet (In Bulk)
- Resolving an Awaiting Payment Order
- Merging Orders in Network Manager
- Exporting Orders
- Filtering Orders
- Resolving Missing Product Info Orders
- How to Add an item to an existing order
- Missing Fulfillment Source
-
Products
- Exporting Products
- Associating and Creating a Listing SKU
- How to Manage Products
- Reassign a Listing SKU to Another Product
- Creating Products
- Creating Listing SKUs in Bulk (via Spreadsheet)
- How to Disable Inventory Updates for a Specific Sales Channel
- How does Extensiv Order Manager handle variations of the same product?
- Creating Products via Spreadsheet
- Adjusting Master SKUs
- Custom Bundle/Kit Export
- Inventory
-
Settings
-
Sales Channel
- How to Enable Out of Stock Control for eBay Sales Channels
- Shopify Locations
- Shopify Tags
- Enable or Disable Extensiv Network Manager Email Notifications to Your Customers
- Deactivating a Sales Channel
- Adding Shopify as a Sales Channel
- Viewing a Sales Channel's Edit History
- Adding Amazon as a Sales Channel
- Adding eBay as a Sales Channel
- Adding Walmart as a Sales Channel
- Editing Sales Channels
- Adding a Manual Sales Channel
- How to Exclude a Warehouse From Pushing Inventory to a Sales Channel
- Adding Sales Channels
- Reactivating Sales Channels
- Webhooks
-
Warehouses
- Setting Up a Warehouse's International Rank
- Set Up Field Mappings of Import/Export Files
- FTP Inventory Import for a 3PL
- Setting Up Domestic Backup Warehouses
- Creating and Configuring Warehouses in Extensiv Network Manager
- Deactivating a Warehouse in Extensiv Network Manager
- Updating the Address/Return Address for Your Warehouse
- Enabling Use Component Inventory Setting for Bundles and Kits
- Orderbots
-
Sales Channel
-
Orders
Validating Shipping Addresses
To avoid sending an order to an incorrect or wrong address, you need to validate a customer's address before shipping an order.
Validated Addresses
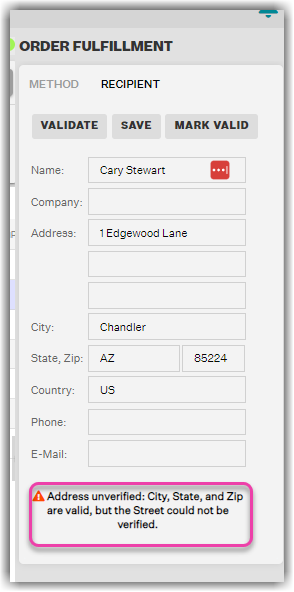
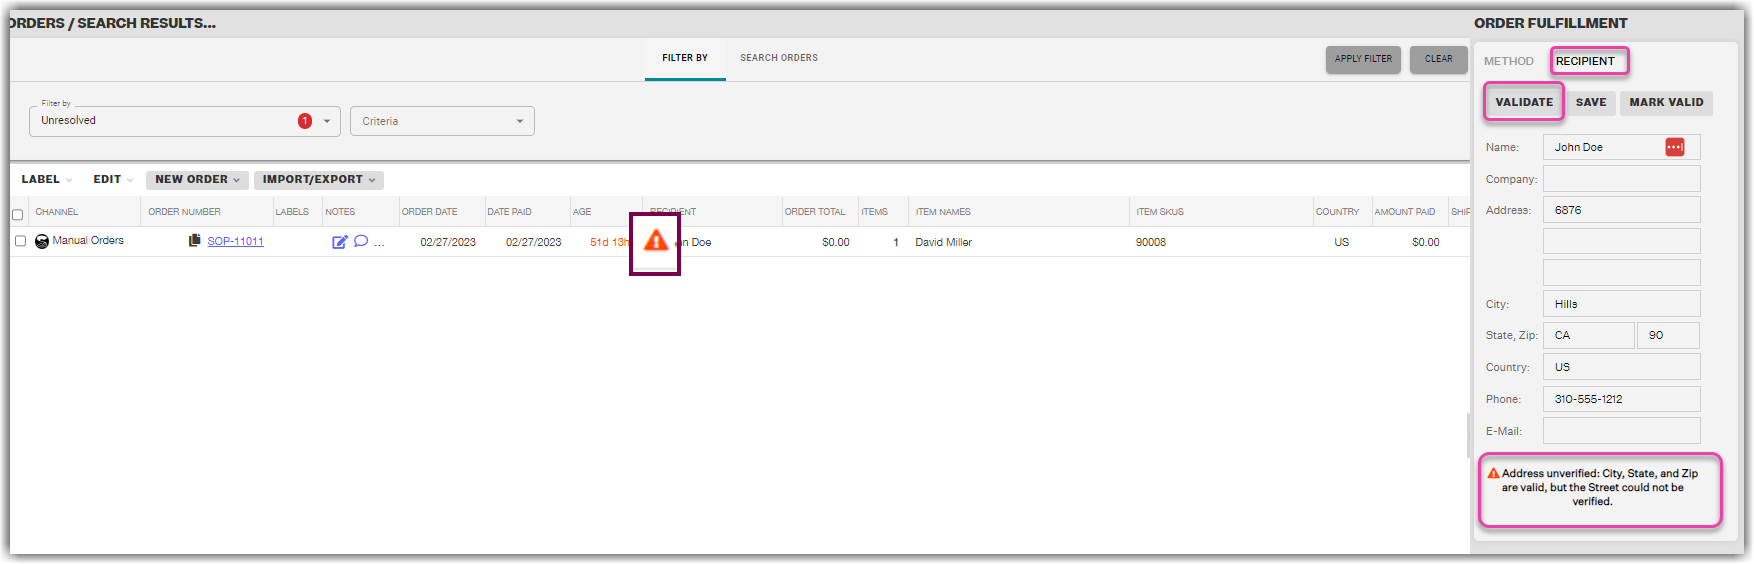
Extensiv Network Manager displays an icon to indicate the validation status of an order's delivery address. This icon appears in the Orders Module alongside the recipient's name and in the Order Fulfillment - Recipient screen.

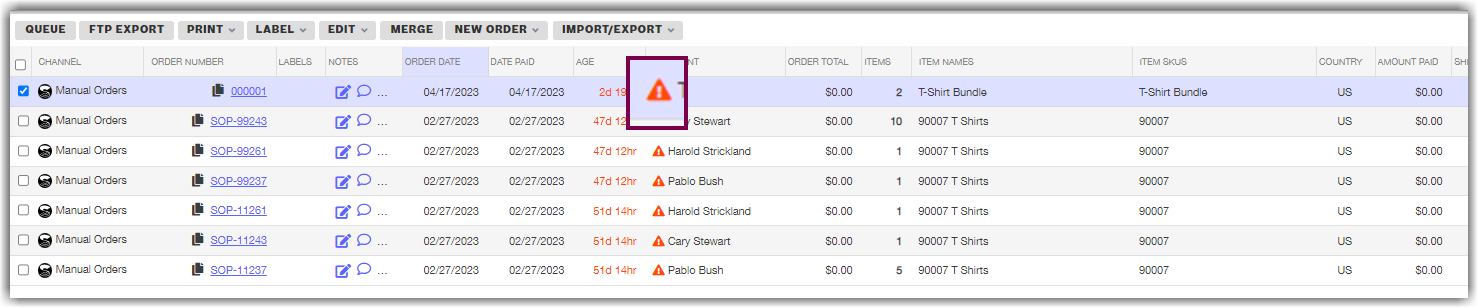
Extensiv Network Manager will detect that a shipping address has not been validated, and will display a message to this effect on the Order Fulfillment panel within the Orders module. The error message disappears once you validate the address.
Validating an address
- On the Orders panel in the center, click anywhere on the row showing the order.
- On the Order Fulfillment panel on the right, click the Recipient tab.
- Click Validate to start validating the address. Once successful, an Address Verified message is displayed at the bottom of the Order Fulfillment panel.
You can then continue with the order fulfillment process, secure in the knowledge that possible shipping errors due to an incorrect address may have been minimized.
Automatic Address Correction
In addition to validating delivery addresses, Extensiv Network Manager can also automatically standardize and correct addresses for supported countries.
This feature is enabled and disabled on a per-store basis.
- Go to the Settings Module - Sales Channels tab
- Select a Sales Channel. Click on the Edit icon.
- Mark "Automatically standardize incorrect order addresses" as checked.
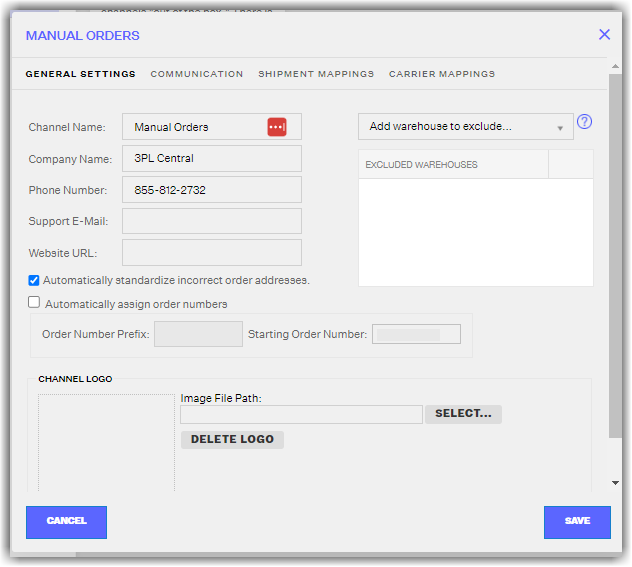
The "Automatically standardize incorrect order addresses" function will first try to use the ship method shipping provider assigned to the order. If none exists, the order of priority is based on what providers you have in your Extensiv Network Manager account. The default order will go as follows: Endicia, UPS, FedEx. If your Extensiv Network Manager account does not use any of those three providers, the validation will default to Endicia.
4. Click Save.