-
Order Routing Management
-
Orders
- Apply Actions to Existing Orders in Bulk
- Custom Fields for Orders (Custom Columns)
- Duplicate or Clone an Order
- Customizing the organization of Columns in the Orders Module
- Resolving an Order in Missing Product Information Status
- Restoring a Canceled Order
- Cancel an Order
- Restore an On-Hold Order
- Creating a Manual Order
- Out of Stock Orders
- Creating a Manual Order - Single or Bulk
- Manually Mark an Order as Shipped - Individually or in Bulk
- Export an Order to a 3PL
- Validating Shipping Addresses
- Missing Order Info
- Importing Orders Via Spreadsheet (In Bulk)
- Resolving an Awaiting Payment Order
- Merging Orders in Network Manager
- Exporting Orders
- Filtering Orders
- Resolving Missing Product Info Orders
- How to Add an item to an existing order
- Missing Fulfillment Source
-
Products
- Exporting Products
- Associating and Creating a Listing SKU
- How to Manage Products
- Reassign a Listing SKU to Another Product
- Creating Products
- Creating Listing SKUs in Bulk (via Spreadsheet)
- How to Disable Inventory Updates for a Specific Sales Channel
- How does Extensiv Order Manager handle variations of the same product?
- Creating Products via Spreadsheet
- Adjusting Master SKUs
- Custom Bundle/Kit Export
- Inventory
-
Settings
-
Sales Channel
- How to Enable Out of Stock Control for eBay Sales Channels
- Shopify Locations
- Shopify Tags
- Enable or Disable Extensiv Network Manager Email Notifications to Your Customers
- Deactivating a Sales Channel
- Adding Shopify as a Sales Channel
- Viewing a Sales Channel's Edit History
- Adding Amazon as a Sales Channel
- Adding eBay as a Sales Channel
- Adding Walmart as a Sales Channel
- Editing Sales Channels
- Adding a Manual Sales Channel
- How to Exclude a Warehouse From Pushing Inventory to a Sales Channel
- Adding Sales Channels
- Reactivating Sales Channels
- Webhooks
-
Warehouses
- Setting Up a Warehouse's International Rank
- Set Up Field Mappings of Import/Export Files
- FTP Inventory Import for a 3PL
- Setting Up Domestic Backup Warehouses
- Creating and Configuring Warehouses in Extensiv Network Manager
- Deactivating a Warehouse in Extensiv Network Manager
- Updating the Address/Return Address for Your Warehouse
- Enabling Use Component Inventory Setting for Bundles and Kits
- Orderbots
-
Sales Channel
-
Orders
Manually Mark an Order as Shipped - Individually or in Bulk
Orders that are not processed through Extensiv Network Manager's Shipping module need to be manually marked as shipped. This feature can also be used for orders of digital products that do not need to have a physical shipment sent. You can make this edit on orders individually or in bulk.
Orders in Unresolved, Pending Fulfillment, On Hold, or Cancelled status cannot be marked as shipped.
To manually mark an order as Shipped, follow the steps below:
- Go to the Orders Module.
- By default, the Orders Module displays the orders that are awaiting shipment. Select the order you want to mark as shipped using the checkboxes in the left-most column. To Bulk Mark as Shipped, select more than one order. To select all orders, select the topmost checkbox, in the Column Type row.
If the orders are Awaiting Dropship or Awaiting 3PL Export,click the corresponding status on the Search/Filter pane on the left, then select the orders to be marked as shipped.
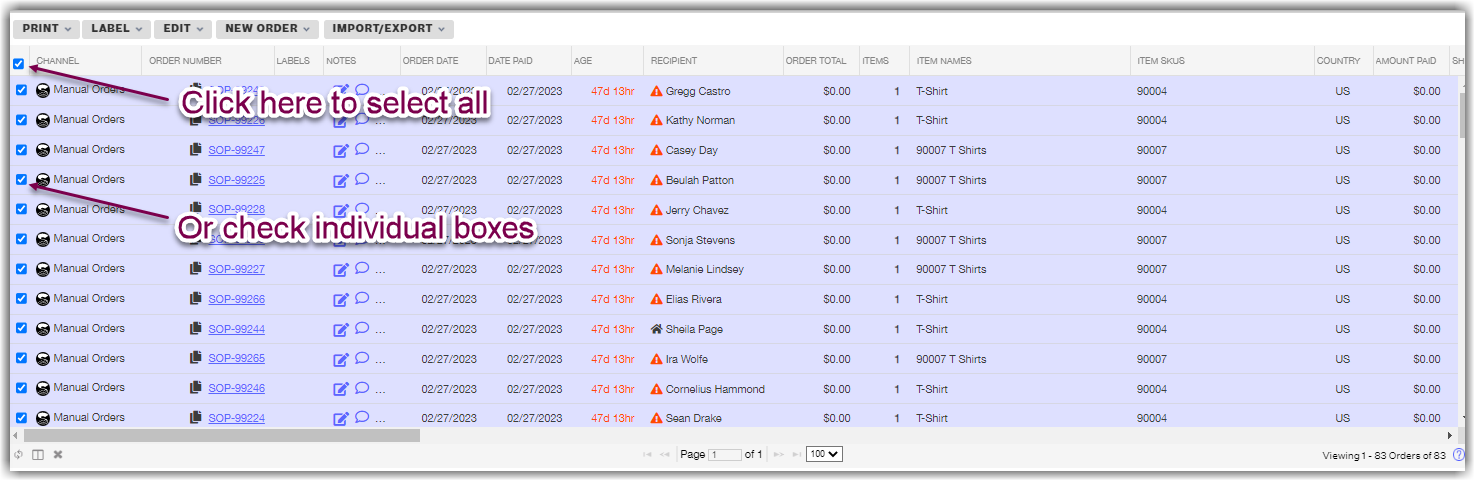
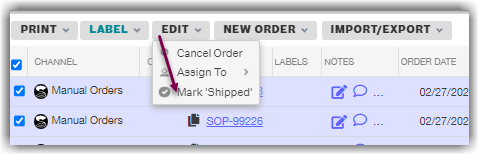
- Go to the Edit dropdown menu and click Mark ‘Shipped.’
- On the Create External Shipments window, enter the tracking number and shipping carrier for the selected order, select either Yes or No to indicate whether you want to notify the customer and update the channel where the order is from, then enter the ship date. The tracking number and shipping carrier can be valid values or artificial, the choice is up to you. If you use an artificial tracking number, you may not want to choose to update the customer or channel.
To update multiple orders with the same values, populate the fields in the Bulk Selection row and all orders will automatically update with those bulk options. To input an Artificial Tracking Number specifically to apply to all orders here, enter the tracking number value, then click the triangle icon adjacent to that field as seen below.
Required Values: Tracking Number, Shipping Carrier, Notify Customer, Update Channel - 
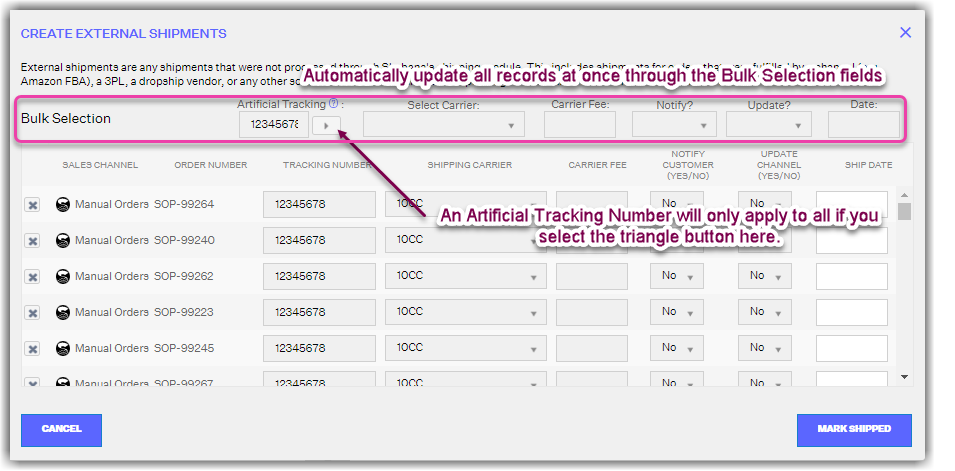
Click Mark Shipped to update the order(s) status to Shipped.